How to Use Beading Chain with Zola Elements Wood and Resin Pendants

SKU VID-1751
Designer: Alexandra Smith
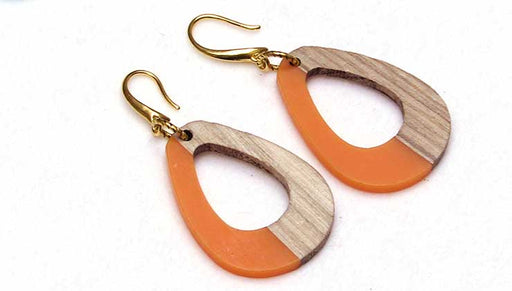
In this video, you will see from start to finish how to make this project using wood and resin stick drops by Zola Elements. First, you will see how to create an earring using beading chain and crimp cord ends. Then you will see how to make the matching necklace. You will also see other colors and sizes of Zola Elements wood and resin stick drops.
FEATURED IN THIS VIDEO
Audio Transcript
Note: This audio transcript is auto-generated and may not be completely accurate.
hi this is Alexandra at beadaholique you how to use beading chain with Zola elements wood and resin pendants so in this video we'll be making the mod matchstick necklace and earring set using these stick drop pendants and these come in a variety of sizes and colors I want to show you for this project we'll be using the sea green color but up here we've got saffron we've got angel skin we've got alabaster emerald there's a saffron and the turquoise and indigo and so these are three and a half by 40 millimeters long and then there's a shorter version that is 30 millimeters long and then over here an alternative shape is this six by seventeen millimeter rectangle focal and an alternative design idea for this that I had was just to put it on a simple hoop I think that's a very nice look so to get started here I've got one earring done and I'm staying very simple and clean with these lines I really like the juxtaposition of the modern look with the organic textures I also wanted to point out that depending on the direction of the drill you'll notice that the whole side has a lighter striation and then the opposite side has a bit of a darker one and there's a there's a variegated texture there because of the natural nature of these pieces so to get started what I'll be using are some beading chain this is one millimeter beading chain I've got a six millimeter spring ring with a four millimeter jump ring and some two by three millimeter bead crimps with loops on them an earring hook and then four tools over here I have cutters chain pliers and bent nose pliers and also a crimping plier all right so to get started what we'll do is make the match to this earring and I'm going to take up my chain I'm going to measure out two and a half inches now I do notice there's a little bit of a kink on that portion of my chain so I think I'm gonna go with the other side of it make sure it's nice and straight and with my side cutter I'm going to come in and clip that right where I want it now I'm gonna take the 30 millimeter length drop and slide it on and grab one of my crimp beads this is like a little cord end with a loop on it and also my crimping tool and so in my left hand because I am right-handed I want to be able to utilize the tool with my right hand and get it gripped with my left I'm going to line up the two ends of my chain and tuck them right into the well of this crimp bead now I'm positioning it such that the the loop is facing me and that's going to make sure that the earring lays straight the way I want it to so I'm going to bring that bead into the back trough of my crimping tool to crease the bead then I'll bring it crossways into the front trough of my plier and fold it over and that's a nice clean way to finish off this beading chain so then we'll put on our earring hook I've got a bald earring hook here and with my plier just gonna bend that forward slightly and slide on the loop of my crimp now I want to make sure that the crease side is going to be in the back so that that opposite I usually I have a 50/50 chance and I usually get it backward so let me flip that around come on to my earring hook facing forward just check that closed I think that's a very clean pretty pretty earring now also you obviously don't have to wear this as a set you could do the earrings only or the necklace whatever you prefer so for the necklace I'm gonna make about a 15 and a half inch cut on this chain taking into account that my clasp will add about a half inch of length now I've chosen a spring ring clasp just to stay really lightweight to minimize the chance of the clasp sliding to the front and I'm going to pick one of these 40 millimeter long drops and slide it on and my other idea a design idea could be to put a real simple bead on either side if you wanted to do that so we're gonna use the same finding I'm going to tuck just one chain into the well of this crimp work with gravity here there we go the same process I'm just gonna crease the bead I'm gonna fold it over and I'll do the same thing on the other side I really like working with these little crimping these that have the loops I've found them very useful in designs where I don't really want the finishing to show and it accommodates both chains ending so well alright so we got those on and now we'll put on that clasp get my ruler out of the way bring this in and get one of my jump rings take up my plier and open that up and they slide on the loop of my spring ring and also the loop of my crimping bead close it up this has been a just a quick and easy project using these fun findings and what we're seeing is just with the wood jewelry staying very very clean and simple with it so there's the mod matchstick necklace and earring set I hope you enjoyed this video all of these supplies and tools are available at beadaholique.com be sure to click the belt and subscribe on our youtube channel for all the latest updates thanks for watching

You recently viewed

Clear recently viewed