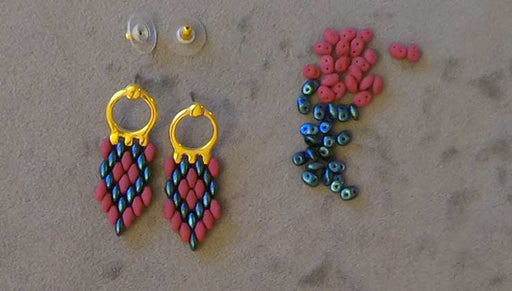
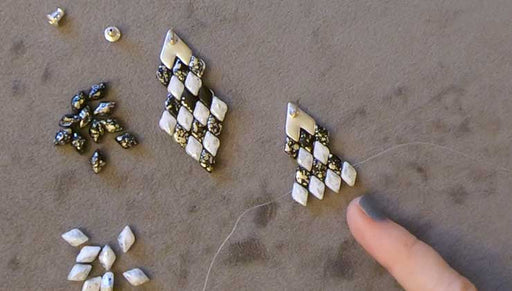
How to Finish Peyote Bead Weaving with a Stitch-in Connector and Button Closure

SKU VID-1818
Designer: Kat Silvia
In this video you will see how to add a stitch-in connector to peyote bead weaving to allow you to attach a button closure. This technique will also work when using a toggle clasp or another two part closure, or to add charms and pendants to your bead weaving.
Audio Transcript
Note: This audio transcript is auto-generated and may not be completely accurate.
hi this is kat with beadaholique.com and in this video i'm going to show you how to finish peyote bead weaving with a stitch and connector and button closure now i have a finished example here because i want you to be able to really see what we're going to be doing here so this is my example i have a button here and then i have a loop that i've created with seed beads on this side but what's really neat is i have this little stitch in connector here and you can actually see it on the back side here now of course in my finished design i will utilize the silver so i wanted it to kind of blend in as much as possible back there but you can see that basically what it does is it's going to mimic three little 8-0 seed beads in our design so as you can look a little bit closer here you can see that it really sort of just goes right in it's nice and flat against the wrist but on this side we have that nice little loop that's been built for us on top there so we can attach our button with a little jump ring and then it comes around to go through our little loop and we can finish off our lovely little design like so all right so let's go ahead and show you what this little stitching connector looks like when it's not attached to a bracelet so it looks like this it's got these three little loops here on the bottom which are going to like i said mimic those 8 0 seed beads and it's got our big loop on the top now the cool thing is is that it this doesn't have to just go for a closure you can add this to the center of your design and add little charms along so it's actually really really fun okay so what i'm going to do here is like i said i'm using some 8-0 seed beads i have a couple little other examples of some buttons here i just wanted you to see the little variety i have my jump ring which i'm going to use later but i'm going to begin this by taking my size 12 needle and i have just about two or three feet here just for my demonstration of the crystal fire line i wanted you to hopefully be able to see the white up against the gray a little bit easier so the first thing i'm going to do is i'm going to pick up this little black seed bead that i have here i'm going to create a stopper bead so i'm going to pull it down to one side leaving about i'd say an 8 inch tail or so and then i'm just going to go back through that same bead and catch it so now i have my little stopper bead ready to go now i'm going to do this version as seen in this design with an odd count peyote however you can also do this with even count peyote it will work just the same like i said we're just really focusing on treating those three little loops as seed beads okay so let's go ahead and i'm gonna pick up my seed beads here and i'm just gonna use one color just to make it easy two three four five six seven eight and nine i'm gonna go nine beads wide and now i'm gonna go through this pretty quickly but this is how you do odd count peyote you just pick up one bead skip over the first go into the next pick up another skip a bead go into the next speed we do have a full video showing you how to do odd count peyote in a much more uh slower fashion this ad count peyote can be a little more difficult than even count peyote and it's because of the turnaround that we're going to do at the end but i figured that this would be a really easy way to showcase this for you so let's see here let me see if i can get a little closer to the camera there we go all right and i'm coming to that very last bead there and now i'm going to pick up one more bead just one go ahead and pop that down to the end there we go all right and now i'm just gonna turn around and go through just that purple bead ignore that black bead that's just a little stopper bead there go up through all three beads do my little turn around going through that next bead there going down through those two and turning it around on that bead there okay so now that you've like you know seen the turnaround you know for all intents and purposes the reason why i like to do it this way and let me go ahead and put this down because i want to be able to show you this so when you do that first turn around what you get is you have that cord coming out towards the center of the bead weaving as opposed to this ending bead here with that cord coming out this way now if you look at my design on the back on the button side there's no extra beads at the very end there and it's because i was able to weave in that tail now when you come to this side and we'll get there and i'll show you how this works you'll notice that you're going to have two little beads that might sort of notch themselves away from the bead weaving a little bit even though they are part of the pattern and it is those little gray beads right there those are part of the pattern but i needed it to be coming out of a certain bead to be able to create that hoop so it's going to be coming on the interior so i'm going to show you what that is so so if you're if you're doing this with me right now don't panic there's a reason for it i promise but we're going to start doing it on this side now what i want to do first is i want to add one more row of seed beads and the reason i like to add this third row before i add my stitching connector is just to give it a little bit of extra stability so i'm just going to go through and add one bead at a time and of course when you get to this side the turnaround is like an even count peyote so you just turn it around and add your bead there now i'm going to add one more bead and now i'm coming to the center so this is where i'm going to pick up my stitch and connector now if you want this to face down you absolutely can do that if you want to face up you can absolutely do that so what i'm going to do is i'm going to face mine up i'm going to go through that very first little hole there and then i'm going to go through that bead so as though i was just picking up a bead just like so so you're not adding another purple bead and now we go through again and here is where we do our little turn around making sure my beat sits at the top there we go now all you're going to do like i said is going to treat that little connector like a bead so what are we gonna do on this side we're just gonna pick up another purple bead go through another bead pick up another purple bead and we're gonna go through that same hole that we just added on our connector sorry see if i can get it closer to camera closer to right through the connector we're just treating it like another bead so we're not adding any more around it yet we're gonna pick it pick up another one and go through that one there pick up another one and go through now this is designed to work with the 8-0 seed beads if you want to try it with some other seed beads i fully encourage uh some experimentation please do that all right so now i'm coming through and i'm coming out of this little bead now normally i would pick up another bead but i'm just going to go through that center hole there so that was my bead that i picked up but don't forget to go through the adjacent bead because that's where you would normally have gone out so you see how we're just sort of stitching it in there right on the back okay and then we just continue one more do a quick little turn around here and uh oftentimes people will ask is there a reason to do odd count over eight count even count and i always say it just comes down to the pattern you know if you want to do a pattern where you have a center line like you can see in my example there i wanted to do some diamonds i needed that center point that's why i chose to do odd count but you can absolutely do even count if your pattern allows for it or if that's the pattern you want to design and like i said this will work the same way you'll notice that i've put it in the center there so it wouldn't really kind of matter now you could try to put this on the end of your bead weaving like if you wanted to do it on the on the very tail end there it should work just the same it should be just as stable so again i'm coming back to the center here so i'm going to go through that center bead right there and then just treating it like such because you'll notice that when you go through one way it's where you would pick up that bead you know like for example if i'm working up and down it's always on my downstroke that i'm actually picking up that connector if that makes sense okay bring that through all right we're going to go through that purple bead just kind of sneak your needle around because we have this big old loop in front of us now and then we would pretend like we're picking up that gold bead and going through that purple bead all right and picking up purple and we're going to do our little turn around and because we're getting close to having it be fully fully stitched in the reason i'm doing this whole piece is i do want to show you how it looks on the other side with creating that loop because it can be a little little tricky and it is definitely the difference between an odd count and an even count all right turn that around and we're going back the other way back through my little last gold bead there in my connector just treating it as such okay so now here's where it's going to get start to look a little different because now we are done connecting our connector so all i'm going to do here is i'm just going to pick up another seed bead and kind of skip right over it so it's completely nestled in there now so we are finished with adding the connector in so i'm just going to do one more row just to finish it off and show you and then we're going to do that loop at the end now you could also in my example there i have one of the stitching connectors used but we do sell them in pairs at beadaholique.com so if you do get the pair the other option for you is you can do this on both sides of your bead weaving and let's say you wanted to do a toggle clasp well you could just connect using jump rings one bar end and one toggle to the end so you can always do it that way too all right so we are in business now you can see how this is working i'm just going to kind of whip through one more really fast and i know this is a little bit of a quick and dirty version of peyote so if you are unfamiliar with the stitch again we do have lots of other tutorial videos that will walk you through every little step of it okay so i'm doing the last turn around here there we go and now with this last turn around i'm coming out into the center of the bead weaving so remember how i was talking about this is our starting side let me just move my stopper bar so this side here i have it coming out the side and this side it's coming in now i just want to flip it over and show you how it looks on the back with that gold so you can really see that you see that so it just fits nice and flush it looks like three little gold seed beads it's very nice actually they tierracast did a beautiful job designing this and i think it's going to be utilized a lot by um by us here at beadaholique.com okay now that we've done this let's say i've finished my design and i'm ready to add that loop for that button closure now this is where it depends on how much um how many beads to fit over your buttons so here's how i like to do that so i'm gonna try to gauge here so six seven eight nine ten ten that's ten right three four five ten eleven 12 13 14 and 15. i'm gonna go with 15. there we go scooch scooch all right so now because i'm coming out towards the center there i want to do the same on the other side so i'm going to go through this bead on the outside just like so does that make sense okay now we're just going to do that and i like to kind of just wiggle everybody around make sure that it's taut but not pulling too much and now i can fold my piece over let's say this is the end and just see if i can sneak my piece through here without it buckling too much and if it works which i know 15 does because that's what i did for this particular design but if you're working with one of these smaller buttons or perhaps it's a different kind of size or shape you might need to adjust that now from here all i need to do is just i'm going to turn my thread around here and what i'm going to do because this is going to be a button closure i am going to weave all the way back through this top row because i need this to be nice and strong so weave all the way through now you can see i'm catching two beads at once if your beads are too tightly stitched that's okay just go through one bead at a time but just make sure that you do this turn around again so you want to come out that second bead and go up through the bead where we initially came out and now i'm just going to run my needle along that whole thing one more time because again i you know for me i want my clasps to be really really secure i don't want to lose any beads i don't want things to fall apart especially if i'm you know selling or giving anything away i want to make sure that i am doing my best as a designer to make sure that everything is secure all right so now you can just go through and just finish that off tie it in and now i'm just going to go up here i'm just going to go up two beads i'll just show you how i like to tie it off you can tie it off however you desire but i'm just going to go through go underneath that little thread bridge there create a little knot pull through and just gonna repeat that i like to do at least two knots sometimes three depending on how wobbly i feel my work is sometimes just the beads tend to tend to crunch a little if you get it too tight so i want to give it some good tension but not too much alright so there we go so i am very happy with that you can come in with your scissors or your thread zap i'm going to come in and just clip that off with some scissors there slip stitch there we go all right so you just cut it with scissors and then you can come to this other side here remove that bead stopper and on this side let's say you were doing let me just thread this there we go let's say you were doing even count peyote if you're doing even count peyote you're going to be coming out the side here you won't get this opportunity to do this kind of a loop unless you go down through and here's the thing you can absolutely loop outside you can sort of add on your beads and they would just sort of let me just try to show you they would just sit outside so it would just be a little bit of a wider loop but let's say you didn't want to do that all you need to do is find your way to get back through that loop so i'm going to go down through this back side here i'm going to come up through that next adjacent bead i'm going to go through one more and now i'm going to turn it around and i'm going to go down through these two beads here down through the side bead and up through this bead here so now i can add that same loop but this bead over here let's assume this row doesn't exist where my where my thumbnail is there it's just going to go into that little row there so it will be a little um i'm not going to say off uh but you just notice that you'll have to go down a bead as opposed to going through the next bead so you can either choose how to do that the other alternative is that you can come in and you can make a smaller loop so let's say you could come in so i use sample pieces there's so much thread in here you could come in here and let's say you wanted to just create a little loop by doing something like this if you were using maybe let's say a smaller button so you just pick up a whole bunch of seed beads here you could pick up a loop like that and just go into like the next one there and just create a smaller little little loop for uh whatever button that you're working with so there's lots of options with this i know i kind of threw a lot at you there but these stitching connectors are easy to use the thing that i want you to remember and take away from this is to just simply use them like you would other seed beads so just count them as three seed beads in your row and then when you are ready you just come in with your chain nose pliers and bench chain nose pliers there twist open a little jump ring slip it on and let's grab this gold one here to pretend this is an actual design and we're just gonna come in sneak our pliers in there and close up that jump ring so it does give a really nice little finished look again i want you to definitely experiment with some wonderful charms with some toggle clasps this is a great little thing to use with peyote bead weaving and yes to answer your questions it does work with other types of bead weaving i will be doing some more videos on that in the very near future so thanks so much for joining me and if you're new to our youtube channel here be sure to hit that subscribe button below and if you have any questions about this leave it in the comments below and i am here to help you all right thanks so much for watching everyone you can get all of these supplies and everything you've seen here by heading over to beadaholique.com you

You recently viewed

Clear recently viewed