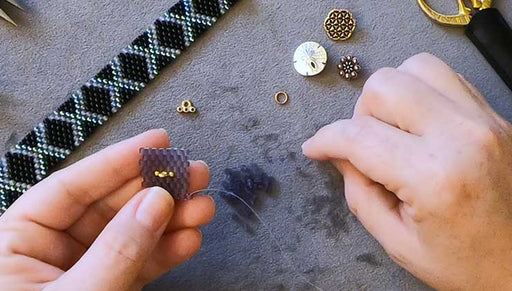
How to Add Peyote Bead Weaving to a Channel Bead and Finish on a Leather Necklace

SKU VID-1848
Designer: Kat Silvia
In this video you will see how you can wrap a channel bead in even count peyote bead weaving. You'll also see how you can finish the look by simply adding it to a strand of leather for a minimalist, chic look.
Audio Transcript
Note: This audio transcript is auto-generated and may not be completely accurate.
hi this is kat with beadaholique.com and in this video i'm going to show you how to add peyote bead weaving to a channel bead and finish it with a nice leather necklace so you can see the piece that we're going to be making here today now this i used the gold nunn design channel bead and some miyuki delicas and i have that nice little leather and we're also going to finish it off with those leather crimps and a nice magnetic clasp so let's start by how we add the peyote bead weaving to this channel bead now this particular channel bead will give you 8 by 17 beads so that's the strip that i have right here for you now one of the things i'll say is that you can use glue if you like so if you kind of look here you can see that if i hold the ends it it will rotate a little bit it's nice and tight however if you wanted to create some sort of a pattern you can do that but also you can add glue if you like however that peyote bead weaving is not going to be um sliding off or anything so you don't need to worry about that okay so because this is a nice even count we can just zip it up together so you just lay your channel bead in there and as we bring those two ends together you're gonna kind of create little teeth so let me bring it up close to the camera here actually i'm going to rotate it so i start from the bottom because i have my needle attached to this end here and the great thing about this is like i said you can create a pattern but you don't have to and it doesn't take very many beads so this is a great thing to do if you have just little bits and bobs of beads left over okay so i'm coming out of this bead here at the bottom so what i need to do is kind of swing over as though i'm going to be adding another row but i'm going to actually add this row as my up beads so i'm going through just that one there on the end pushing my needle through and coming up and you're going to already start to see it kind of come together there and then as though i was continuing my row i'm going to go through this bead right here there we go so you can see the bead i'm going through so again you're just kind of zigzagging and you're zipping up that peyote so you're just going through the next speed on the other side and you're just alternating you're just going back and forth there we go and another one and i think it's really it's really fun to be able to do little tiny components like this you could actually put this on a chain as well like i said i'm going to do it on the leather here today oops i'm going to make sure we get that tail out of there from our other side so i'm just going to bring that down and kind of hold that out of the way but you can just see that it's coming together so you won't actually see any seam so if you are creating a pattern again it's 8 by 17 so we can just create it that way all right so now we're getting really tight here towards the end just zip zip zip zip all right so now what we want to do is we want to come around so you can see i flipped the bead around so this is where my tail was coming out the other side there let me just make sure we're in focus there we go and now i can come around on this side and kind of do the same thing where i just zip that those last couple together now what i'm going to do is just go through a couple more of those beads remembering to not create any thread bridges so just keep working with the little with the little stairs the little bricks and they're kind you know so just don't go all the way across your bead weaving just go one at a time and then i'm going to go down through and all i'm doing here is i'm just getting to a place where i can tie off this thread and then i'm just going to do the same on the other side there we go so now i'm just going to go down into my bead weaving catch a little thread bridge you can see my needle's caught there underneath and i'm just going to come in and do a nice little knot and weave through one more bead there and then i can just come in you can use a thread zap or you can use snips here and all i need to do now is come to the other side and repeat that process but on this side since we're all zipped up all i really need to do is just tie off this little tail now you could do this in the beginning you could tie off your tail i like to just kind of make sure that it's woven through and you can see that i'm using somewhat dark seed beads on this one that kind of dark grape purple if you are using lighter seed beads you can use the crystal fire line so if that is going to work better with your style and also oops you can see it moving around what i love about this channel bead is that this is a great opportunity to use some of those transparent beads that we don't often use mostly because you know you're going to see that thread through there but on the silver and especially the gold seed beads or excuse me um channel beads what's really nice is you're going to get that silver coming through so you're actually going to get a really nice tone so it's a good opportunity to utilize those if that's what you're into all right so now let's go ahead and we're going to take our little leather piece here and go ahead and slide on your bead let it fall to the center it's going to kind of move around there you can always get stopper beads if you don't like that style but we are going to continue here and we're going to add on our little leather crimps now these are little crimp beads here but they have a little loop to the end and you can see that center channel there that's what we're going to be crimping so let's go ahead and slide that on and we're going to come in with our really fine chain nose pliers here these are actually my zero on four and one crimping pliers but they have the smallest little nose here so i thought it would be really good so what you want to see is so you see how that leather is poking up through the top what we want to do is get it flush there so we don't actually see that leather and then give it a nice good squeeze you might need to kind of move your pliers around give it a couple little squeezes there right in that center channel and then we just do a little test oh hey that's actually pretty good all right so let's move to the other side here we're just going to repeat that process so again making sure that leather is not poking up through the top come in with your chain nose pliers there and squeeze squeeze squeeze squeeze squeeze and i'm just going to kind of flip mine over because i want to make sure i get this side really really good there we go because i don't want to don't want to lose my bead okay give it a nice tug and we are good to go so finally the last and easiest part here is we are just going to open up a couple little jump rings now i'm going to use a magnetic clasp for mine you can always use a lobster clasp if you like or any other type of clasp this is a great little thing to use if you want to do like a multi-strand so like i said you could do this with chain as well and for that if you wanted to you could do a multi-strand uh piece which is really fun i like i like them all right so here we go last little jump ring squeezing that on perfect and make sure you have that nice good closure and here's an extra little tip guys if you are doing uh anything with a magnetic clasp don't just yank it from here to open it go ahead and take these two little pieces and slide them apart that will preserve the life of your magnetic clasp and not put any undue strain on your other piece so i cut i pre-cut mine because i wanted to have a nice small necklace but you can see you can also do this as a bracelet as well you can do it as a choker which is what i have over here it's a nice thin one so it's a lot of fun little options you can actually stack them up i thought about doing several more but i had to restrain myself so i just wanted to show you this basic technique and then let your creative juices run wild all right thanks so much for watching you guys you can get all of these supplies and see even more tutorial videos by heading over to beadaholique.com and if you're new to our youtube channel be sure to hit that subscribe button below to get all the latest from beadaholique.com you

You recently viewed

Clear recently viewed