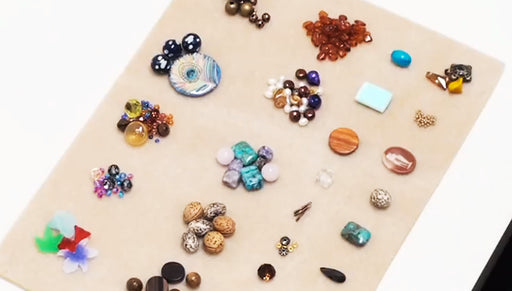
Learn to Bead Video Tutorial #2: All About Findings

SKU VID-0298
Designer: Andrea Morici
Learn about all the different types of findings out there for your creative jewelry making uses. What they are called, what's available, how to use them: everything from bead caps and cones to clasps, headpins, strand reducers, links, earring hooks, bezel settings and beyond.
Audio Transcript
Note: This audio transcript is auto-generated and may not be completely accurate.
Welcome to Beadaholique.com's Learn to Bead Video Series. An ongoing series where we explore the basics of creating your own beaded jewelry. In the first segment we covered beads, all the shapes, sizes and varieties available. In this segment we're gonna cover findings. So when you make your own jewelry and you're going to need to use a combination of beads and findings. The first finding category I want to cover is actually beads spacers which are these little guys right here. As you can see I've used them in this bracelet. A bead spacer is going to do just that. It's going to space out your bead strands to keep them neat and tidy. A strand reducer is gonna take multiple strands like you can see right here in this bracelet as well. It's going to reduce them to just one strand or maybe two. There's different types available but basically you're reducing the number of strands. We also have links. Links do what they say. They link up two different segments. You can have a beaded segment coming out the end. You can link links to links so that they create a continuous strand. They're a handy tool to have in your beading arsenal. Filigree also falls under the heading and findings as well. Filigree is a lot of fun. You can create a lot of pazazz to your jewelry and make it into a statement piece quite easily. You can always bead along the edges where there's open loops and holes. In the final category as well you have bails. Bails are great because they take a pendant like bead and they turned it into a usable pendant. You can actually string right onto some chain or a beaded segment. We have our pinch pendants which basically just put onto a bead and through the hole right there. And now you can put on the chain. Here's another type of pinch pendant. Really simple to use. We have our slider bails they have a opening hoop with them. They can slide onto a chain. We have our shape on bails. Just going to go go ahead and put through the hole of the bead. Close that back up and that creates a way stringing into a strand. We have our glue on bails. These are great because with a dab of glue and then you can go ahead and put a cabochon or any other type of material you want to put on them and now you can go ahead and string those as well. A very common finding that you're going to be using a lot of are head pins. It's basically how a stopper at the end where there is a decorative a ball, a flower. Oftentimes they'll have a flat head. So what these are going to be they're gonna be the last part of your dangle because you'll have nothing to hook them to. Now if you want to have it on a continue part of the dangle, you would use an eye pin. An eye pin has a little loop at the bottom. You can go ahead and just string your beads on and then you can continue connecting more items to it. This little earring right here I actually used a head pin at the bottom. You can see that it comes to a stop. There's nowhere else you can go. and then for the middle section actually I used an eye pin and then the ends of each of the head pin and the eye pin we've created a simple wire loop which is a technique which we covered in another video. Another very common finding your going to use an awful lot are going to be jump rings. These here are open jump rings basically means that they're open. They have a cut in them that allows you to open them. They're pliable. They come in a variety of shapes and sizes. There's actually a triangle jump ring in there. There's an oval jump rings in addition to round. A close jump ring is a jump ring that looks very similar to open jump ring except for it's completely closed. There is no opening. So what you would end up doing is you would take an open jump ring and connect it to a close jump ring or you to take a dangle or a wrapped wire loop, simple wire loop or whatever you're created, you can connect it to you that and it's not going to go anywhere. There is a jump lock which is very much like an open jump ring except for it has a special locking mechanism. We cover how to use the jump lock in another video as well. So check that out if you want to figure out how to create a very secure bond using jump locks. We also have split rings. Split rings are very much like your car key chain. It's a coil of several rows of wire and there's a opening on each side. You see I can put my fingernail right under there. That's going to create a very secure bond for whatever you're attaching it to. It's not going to be going anywhere once you get your loop in there. Moving along we have bead caps. Bead caps are decorative to flourishes that you can add to your jewelry You can put them on either side of your bead creates an added embellishment there. You can put them snug up to you bead or you can space them that they're a little bit further away depending upon what you want. We also have bead cones. Bead cones can work the same way as a bead cap. They can be a decorative embellishment or they can actually be used as a strand reducer which is what they were used here in this bracelet. We took six beaded strands and we put them through a a bead cone, wired them up in here, and then it took six down to one which is really nice when you're finishing off the piece of jewelry. Once your bead lengths are all linked together and properly spaced using jump rings and links and strand reducers you're going to need a way to finish off your necklace or bracelets or whatever piece of jewelry your creating. For that you're going to need a clasp. So we have the several different types available. We have a toggle clasp which I've used on this bracelet right here and basically you just go ahead and feed the bar through the round shape and that's going to secure it. They too come in for a variety of shapes and colors. You then have a lobster clasp. These are pretty familiar to everyone. They have in the spring action in them. You can then then attach them to jump ring. Make the jump ring the actual hoop on the other end of the clasp or you can go ahead and actually connect it right to link in a chain. You have the hook and eye, which as like a figure eight piece of wire that works as one end of the clasp and you have the hook that goes right through it. You have the 'S' shape. That's pretty self-explanatory here. They're shaped like an 'S'. You have spring ring clasps which is most probably the most common one that you see most often. Just has a little lever that you pull back on and it will worked that way to attached to a jump ring or again another link in a chain. A fun little clasp is actually a magnetic clasp. You can see right here it's got two parts to it. Each one has a magnet and then they just hold together based upon the magnetic force. And then the final type of clasp which you'll come across quite often is a barrel clasp. It's just like a screw and it just screws together for you. But how do you connect your strands to your clasp. More often than not you can be using a crimp bead. Crimp beads come as a round bead that looks much like a seed bead. They also come in a tube form. They work the same way basically. They're creating a secure bond for your beading wire to connect to the clasp and it prevents you from having to have to tie a knot which could come undone or try to find another way of connecting that beading wire. For crimp tubes and crimp beads you need a special tools called a crimping plier. It's got a couple indentations here. We explored in another video exactly how to crimp a bead and how to use a crimping plier. It's very handy. We use a lot of them. You can see here on this necklace we have a toggle clasp and we've actually gone ahead and used a crimp tube and that's what a crimp tube looks like once you've crimped it with the crimping pliers. It's basically folded it over onto itself. It secures the beading wire there for you. Now if you did not really like the look of the crimp tube crimp bead there's a handy little thing called bead covers. They're very decorative and basically what you would do is you take not your fingers because usually need a tool, a chain nose pliers or something like that. You just fit it over the top cover your crimp bead and then using your pliers, you just squeeze it shut. Another option you have to finishing off your jewelry piece. Now if you're not making a bracelet or a necklace and say you're making a pair of earrings you're going to have to explore an other category of findings. They're a lot of choices when it comes to earrings. If you don't have your ears pierced you can use clip-on earrings. They have spring action here that actually clamps the earring to your ear and they have an area where you can glue on your earring. So let's say to do a simple little cabochon earring. You would glue that right there and that would be your whole earring. You have a earring hooks right here. These are french hooks. They have a little loop at the bottom which allows you to hang a beaded segment from it. So let's say you've taken a head pin or a eye pin. You put some beads on it. If you've created a simple wire loop at the top or a wrapped wire loop both of those techniques we teach in another video segment. You just connect it to the little loop at the bottom. Usually you can just open that loop the same way you can open a jump ring. Then we have leverback earrings. Here you can just open and like so and close this part here is the part that goes through your ear. You attach your beads to the little hoop at the end. We have thread on earrings right here. Take that part put that through your ear and then this is of course where the actual place where you ear is threaded through. And Then you have hoops. Pretty common and then you have earring posts. Different shapes and sizes. Usually they have some type of the loop at the bottom which allows you to attack should a beaded dangle or they might have a flat back which again you can just glue on a cabochon or other object that you want. If you're using an earring post and need an earring back there's several choices available. Whatever feels more comfortable for you. These have a little plastic rim around them. They fit very nice and snug against the ear. Here's more of the common earring back. Another finding that goes along with the earrings are chandelier earrings. These are a lot of fun. They save a lot of work and you could have a really elaborate looking pair earrings that you create with not a lot of effort. You just hang dangles from the little hooks that are available. You can use the same chandelier earring actually as as strand reducer if you want as well. You can see that you could put multiple strands of jewelry and then have it come to a peak and just have one hoop that you connect to your earring part. You're probably thinking at this point that there are a ton of findings out there and you're absolutely right as you dive into it even more. there's gonna be more findings you're going to explore which we didn't actually cover here because they're trying to cover the most popular and the ones you're going to come across the most often as you start your journey down the wonderful road of beading. One I want to mention really quick are fold over crimps. These are some of my favorite products because they're so simple. Basically you take just a piece of leather or micro suede or any type of cording and you take these little crimps you put the ribbon or the leather right through it. You fold over each end and it creates a secure bond, Next we have ribbon crimps. These are great because you take a piece of ribbon and you take these little pinch crimps. You put the end of the ribbon into the crimp and pinch it shut using from pliers. That's a great way of quickly finishing off a jewelry piece and you just attach a clasp to the end. Other findings which are a lot of fun included ring findings. There's a whole variety available. You can see some of them here. This is a bezel ring finding and this what it looks like when we've actually fill it. Here's a glue on finding. It's got a flat disk and you just adhere some glue to it. Then you can put an object onto it and then we also have beadable rings which are fun because you can take a bunch of head pins or eye pins and you can bead them. They look like this they've got little rings there available right there for you to attach your loops to. And the final category I want to cover is one that's really popular right now. It is bezels. There are an infinite number of bezels out there right now which is just so much fun. You can fill them with the resin. You can make collage pendants. You can put a photograph in them. You can do whatever you want. You can even set down cabochon into them. Basically what a bezel is it is a framework which is raised and then usually have a depressed flat center area and they do come in all shapes. They are actually two-sided bezels which are fun and there's earring bezels as well. I hope you enjoyed this tour our findings. In our next to Learn to Bead video we will cover all the stringing materials which you can use to combine your beads and findings into works of jewelry art. Go to Beadaholique.com for all of your beading supplies needs!

You recently viewed

Clear recently viewed