Beadaholique Live Class: Kumihimo - Beyond the Basics

SKU VID-1749
Designer: Design Team
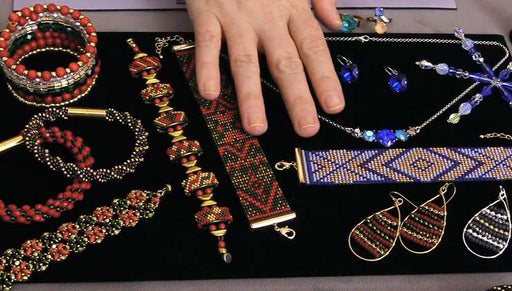
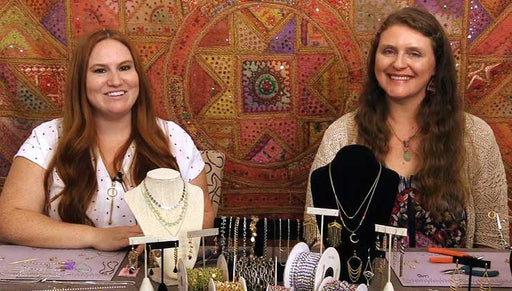
In this live class, join Beadaholique Designers, Kat Silvia and Alexandra Smith, as they push the boundaries of Kumihimo and walk you through Kumihimo with some unconventional materials and techniques. We hope this class will inspire you to take your designs to the next level.
Audio Transcript
Note: This audio transcript is auto-generated and may not be completely accurate.
hi everyone welcome back to the beadaholique studio I'm cat Silvia and I'm joined today by Alexandra Smith and today we are taking your kumihimo beyond the basics so we have a lot of great things to show you today lots of examples we've also been doing some troubleshooting of our own to kind of show you some of the things that have worked but some of the things that also haven't worked so we're gonna be showing you that in this live class here today so we have Bryan behind the camera there he's ready to take your questions and feed them to us so if you guys have specific things you'd like us to address we know that we got a couple of questions earlier from our facebook live so we're gonna be addressing those in this live class but just want to say thanks for joining us guys this is gonna be really funny yeah yeah so beyond the basics is kind of an intro for me this has been a really fun way to dive into this technique I've been enjoying learning how to use different materials than are the conventional traditional way of weaving kumihimo and you're gonna explain some of the different numbers of weave that go into this yeah there's a lot you can really do with kumihimo and I think everybody kind of starts with that basic eight warp yeah unbeaten kumihimo so we do have some examples of that so we're gonna show you what that basic looks like we're not going to teach it in this class because this is really a little bit more of an intermediate class but if you're still new to kumihimo keep watching cuz you'll get to see all the things that you can eventually do once you've really mastered that basic eight warp so we're gonna talk a little bit about what that looks like and we have some new things to show you guys so let's go ahead and invite you in and take a look at our table here so we have lots of great examples here I'll just kind of do a little sweep here we have some beautiful long kumihimo necklaces so this includes a really beautiful design this is actually one of our kits we're gonna actually show you guys some of the kumihimo clusters so those so here's a little like kind of Flowery clusters there and that's a beautiful braided kumihimo so if you just kind of keep looking down here we have some lovely beaded examples you can actually not kumihimo which is really beautiful and fun we have some great examples with some bicones in the front of our table there we have our brand-new kits and we're going to talk about some of the finish techniques and different kinds of clasps different kinds of cord that you can use as well we're also going to start in a little bit here by talking about some of the different discs that we have and why you'd want to use some over the others we have lots of great examples of some materials that you can actually try to do we have beautiful aslam we have lovely not scored we have even beading wire and wire and so there we've got hem we've got flex wire and also the wire wire I like to call it as well as leather and so we'll be focusing on some different projects we've been experimenting with using all of those different materials yeah so we have different little little examples to show you guys because we've gotten a lot of questions of oh can I do kumihimo with leather so we were like let's do kumihimo other and see how that works out so we have some different examples to show you and you know like again we have beaded and unbeaten so that kind of can change your design as well so if you are brand new to joining us here on our live classes we do these every single month so thank you for joining us but we do have a special treat we have a giveaway for all of our live viewers today so if you're tuning in live I just want to show you what you could win today so all you need to do to enter is just leave a comment leave a question let us know where you're tuning in from or what your favorite kumihimo design is or what your favorite color is your pet's name I don't care leave a comment and it enters you to win the giveaway all right so here's the giveaway so I'm gonna kind of show you now this is our brand new kit here this is the splendid spiral kit and this is actually the pink and bronze version so this is a very traditional eight warp with eight OC beads and it's really beautiful and I love this color combination it's nice and subtle but you get that beautiful kind of double spiral that's happening there in the pattern so you're gonna get this full kit which is it going to include that 32 kumihimo disk right there and it's gonna include all of your bobbins and everything you need to get started so this is great if you haven't done kumihimo before and we're also going to be giving you something that you're going to need is a kumihimo weight we're also going to give you some extra finishing pieces here because what we're going to do is we're going to provide you with a few spools of esslyn so you can start to create your own and then last but not least we're going to be giving you the 64 slot disc now this is the advanced disc because you can really get some cool things happening here and I'm gonna actually demonstrate this later on in our class but you can get all of this by leaving a comment and of course every winner here at beadaholique.com and she'll see us use here in just a moment so just leave a comma and we will announce the winner live at the end of our class we usually run about 45 minutes to an hour depending on how many questions we get so please go ahead and leave those comments those questions and stay tuned because you might be the winner all right so this is our giveaway for today very nice yes I like the pinks and the purple isn't feeling it even though I'm all in blue today all right so let's go ahead and dive in and start talking about these discs because they are different and I do want to show you a little bit of why you would use one over the other we get that question quite often so let's start by showing you your traditional kumihimo disk now this is your 32 slot disc and it is a what I'll kind of consider a regular thickness because you'll notice that we do have a kumihimo disk that is that 32 slot but it is a double density so it's kind of double the thickness there now why would you use one over the other in my opinion when you're using the lighter one you can see that it has a little bit of flex to it which is good and it feels good in the hand but if you're really pulling some heavier chords let's say you're working with maybe leather or something else you can use this but it might actually be beneficial to use the double density one this one has less movement for the hand so when you're pulling that cord down you can really make sure that it is secure in there so if this is kind of our recommendation if you're using heavier cords or if you're using a lot of cord and you kind of need to keep everything a little bit more snug and secure now we do get the question often is what happens if your kumihimo disk wears out and what happens with that is I do the light test if you can hold it up to the light and you can see little dots of light coming through that probably means it might be time to place your kumihimo disk but don't worry it's nice and lightweight and easy so that is sort of what can happen you can see that this one has definitely been loved but we've been using this one for years here and it's just fine but you can see that it starts to develop those little notches there because you're pulling cord through you're pulling beads through so however you're doing it there it you can also replace these but you'll notice on the slightly newer double-density does care you really don't see those dots along the side it's because this one hasn't been used yet oh yeah you barely even see the lines where they're cut exactly exactly yeah you just kind of that's why we had those little little notches there to make sure it really sits in there so that's the difference between the regular and the double-density now we do have a version of the mini a kumihimo disk and again this is still that 32 slot disc and this is that regular thickness here but of course we have the mini double density here now the main difference that you're seeing here is probably that Center hold and the reason why the double density is tend to have a slightly larger hole is because they assume there that you're going to be working with thicker cord so you know you might be doing thicker cord you might be adding beads so they give you enough of a hole there because your braid goes down into the center and comes out the other side as you're braiding so this allows for a little bit of a wider braid and now obviously that is a huge braid but it allows for a little bit of movement there so you can kind of see what's happening especially if you are dropping beads down in there you want to make sure that they're getting underneath that cord as we've taught in our previous classes so so that is the regular the mini regular and the mini double density so you have that option as well this is great for travel now the mini versus the regular will not affect the size of your braid at all it will be exactly the same the only difference is your distance from here to the hole is just a little smaller and you know so you might be able to use maybe a little less cord but we're talking a couple inches so don't worry about it alright so those are at the double density ones now down here we have the same kind of a thing now we don't have a double density in this square but this is the square kumihimo plate this is the mini and this is regular-size so again you can see that there's a different size of hole there so if you are working with bigger corn leather we recommend going with the big guy here and the smaller guy here is going to help you with you know travel and maybe if you're working with a smaller brain you want to keep things nice and tight and tiny in there you have that opportunity as well if you are doing beaded flat kumihimo I recommend going with the bigger one you'll just be happier you'll be able to see where those beads fall okay so mm-hmm let's talk about the other one that I know you're all interested in so this bad boy here this is a 64 slot disc now you can see that the slots are much closer together sixty-four around one all the way to 64 so my 32 is down here so this is sort of the double version now what I've been able to do here is I've actually been able to do a 24 warp braid and it's I've set this up color wise so that you can see that it's the same kumihimo and I'm actually going to demonstrate this in a minute here but you work across in pairs of two that's how that works and you can see and I've color coordinated everything for you there so this is a 24 warp and it actually is a really beautiful brand before I flip that over and show you I do want to start and talk about the double density that I have over here and this is the 12 or braid so when you're doing your traditional eight warp you're going to focus on starting yours at the little dots there so you have two four six and eight and you'll have your two cords on each side so you'll start with eight warps this bumps you up to a 12 and it doesn't focus on those dots as much because you have a crisscross pattern now the reason I bring this up is because 12 warp is a different braid than your eighth warp and it has a very different result and the reason is is because of where the cords are placed so what I want to show you now is I'm going to show you the 12 warp and show you why it's different and then I'm going to show you the 24 warp and you see why that is the way it is okay I know this might be confusing but don't worry we have tons of videos on this and when you see the end result you'll understand why all right so I'm going flip this around so that I don't get dizzy so what I'm gonna do is I always have three up and one down so I know exactly where I am when I pick up my board to continue so what I'm gonna do is I'm gonna pick up this last warp and bring it across and bring it down now you can see that I don't have bobbins on this because this is just my sample piece here and I didn't want all the bobbins clicking around as you'll see here in a second but let's go ahead and we're going to rotate it so this is actually your starting position for your kumihimo now you can start up and down or kind of horizontally so I've designed this one so that the spirals are single spirals and I'll show you what that means in a second but the reason is is I have my yellow cords on the side and I have my blue cords on the side and I have that one crisscross that's going to be that sort of finding on the outside so when you're looking at this 12 warp kumihimo you're gonna lift one bring it up and over keeping it on the outside but keep it to the side there and pull that down and then this one we're gonna lift this guy up and bring them up and over and keeping it in the center just like so and then we're going to switch to our blue cord so we're gonna do the same thing just kind of reversing that or mirroring that if you will and then bring this up and over and back down on the side and then I'm just going to rotate 90 degrees so that's where you can stick with your little dots there as a nice little good indicator of how far you're rotating and then you're gonna bring your pink one up and over and this part looks just like regular kumihimo up and over keeping them on their respective sides and then rotate again so now I have the blue in my left hand so I'm gonna go up and over with the blue up and over and down and up and over with that yellow and up and over and down here and then I'm going to rotate and this is 12 warp kumihimo and up and over alright so I'm gonna leave mine like that so I can show you the result because it's actually very cool so this is the result here so as you can see this is a very different braid than your eight warp kumihimo so I have an example of the round or up here to show you now this is done with the same cord obviously a different color but this is that perfectly round braid that is done in a nice little spiral pattern and what happens here is you can see that that pink cord is that sort of pop color that happens there and then you have those two stripes that run congruently down it of that yellow and that blue so that's how this is the pattern for how you would get that type of a style now if you wanted to see that in a beaded version I have one of our kits here so this is a beaded version of the twelve wore kumihimo now this uses an S LAN cord and 11o Miyuki seed beads and these are the round seed beads but you can see how that actually creates a nice little illusion and it because it is popping out you have those gold beads and imagine those gold beads were wear that pink cord is and then the blue and the coral that yellow and blue respectively so that's how this can look in a beaded format so that is one way you can do that I have a couple other examples of 812 warp here now these are done with a different type of pattern and a different type of spiral so instead of getting a spiral going around and following that purple cord there you have a spiral where it is stacked so these actually have their own patterns and we have these both on our website so you guys can learn exactly the placement of the cords and this is actually the exact one that I did in the video so you'll be able to see this one come together but it's a nice way to sort of get a little bit of dimension as opposed to if you're seeing like I said that regular eight warp kumihimo so there you see side by side we have the eight warp and the twelve warp and then twelve warp with beads on it in the eleven o beads and then I have one more example to show you here and this is that 12 warp with eight o beads so when we're talking about different sizes of beads let me kind of clear some of that out of the way for you so it's a little easier to see when we're talking about sizes of beads this right here is going to be that 11 this is that eight and you can just see how much bigger it is and this uses the same cord this is both that sighs 18's lon so this really is the way it is because of the size of the beads not the cord so we get that question quite often so that is the 12 warp so now you can see let me just flip my board back over here you can see that the reason why you set up your disk the way you would is you're actually getting a nice little X here a tight little ass X and then across version and that will give you that little pop there so that is 12 luma hemo so that is a little beyond the basics there break it down yeah well we have these in full videos so if you guys are still going wait what we have it enough open all right so now let's go on and I'm gonna start talking about the 24 warp and before I show you what the braid actually looks like before I flip it over here this one is going to work a little bit more like a traditional kumihimo now when I first started to work with the 64 disc I kind of went a little nuts when I did the 24 warp because it doesn't it doesn't work evenly and that was something that really frustrated me but trust the process and I'll show you what it looks like but you'll notice that some of these have only a couple of things in between and some are a little further apart that's just how it works because when you're doing 24 warps on a 64 slot disk 24 doesn't evenly divide into 64 when you're doing 24 obviously so this is why it is that way so if you're going and you're like oh but they're not all even around the board that's okay you will still end up with a round braid trust the process all right but for this example here and you can see that I have all of my bobbins so this you're gonna need 24 bobbins to do this it's actually quite quite a bit there so what I'm gonna do is again I have three up and one down always always always and now I'm gonna finish that blue warp there and instead of rotating 90 degrees I'm just gonna rotate to the next one so for me that's my gold one here so I'm just going to kind of rotate just as far as I need to go so you're rotating a little bit less when you're doing the 24 word and which is congruent with the eight work exactly yeah and we do get this question often so let me address this as well as I kind of continue and you'll just see me and this is just up and over and down and back so I'm just gonna do a little bit more on camera here turning the board for me I turn mine counterclockwise you can absolutely turn your board clockwise if it feels good for you just know that your spiral will be going the other way and once you've started to turn at your kumihimo one way you can't go backwards because you'll start kind of getting a big knot and undoing parts of the braid so actually it doesn't work that way so once you've decided the direction you'd like to go whatever is more comfortable for you you can keep going that way and I'm gonna do one more here and you can just see that this one you're rotating just a little bit at a time alright so you guys ready to see what this starts to look like I have all my all my crazy colors here alright so this is what that 24 warp braid starts to look like now this is a very thick braid we got a lot of cord happening in there but just look and you can really see that beautiful spiral that starts to happen and you can't even notice which cord was three slots apart or four slots apart like I said it doesn't matter don't get hung up on it it's just the easiest way to do this type of a braid now this is a very thick braid because I am using the one millimeter satin rattail but here's what this braid looks like I'm just kind of stuck that down here's what this braid looks like when you do it with s lon so this is the much thinner version of the braid so this was kind of an a very fun little rainbow style there so you can see that it has that nice spiral but it has a little bit of a stepped spiral to it so this is that kind of style so you can really enjoy some of the s lon with that and we do have a question we are gonna talk exactly about some finishing techniques and some end caps so the question was how do you determine which end cap is is best for your particular project now we're definitely gonna go into that because that is a big question because you have this big beautiful braid and how do you finish it so we're gonna talk about that for sure but before I continue there I do want to show you a little bit more regarding the 24 because I tried something that was really interesting I wanted to just wanted this to work so badly so I did a 24 warp in a single color here so this is my little swatch and before I kind of reveal what happened I wanted to try to add beads so I thought okay well it's a big braid as it is let me try adding 11 OC beads to every warp this is what happened it just got really messy and clunky and I just really didn't like it so I was like alright let me try again let me try to add 8 o beads same kind of a thing so this is what happens when you try to add beads to every single strand of your 24 warp now when I was finished with this my first thought was okay what if I tried to add beads to one or two or even maybe like four warps like would it give me a cool spiral so that's what I'm gonna be testing out and I'd love to hear your thoughts if you've tested this out if you've tried it we'd love to see what it looks like I'm so curious and you know in preparation for this live class I wanted to do so many more examples but this is kind of where I stopped with the 24 warp but I'm loving the way this looks and it's actually very cool it's it's it's a thick braid for sure but I was actually thinking it could be kind of a kind of a fun little craft project there so I'm gonna keep going with this it's kind of some wacky colors but I I'm really digging it but I am gonna try some more with the 24 warp there's also a 16 warp that I'm gonna be testing out and I'm gonna be doing a video for you guys so when we talk about going beyond the basics it really is anything that's sort of beyond that eight warp so speaking of the S lon I do want to show you the two different sizes that we're excuse me the satin rattail because that's what I'm using here so we have the 1 millimeter and the 2 millimeter and I just wanted to bring these out side by side so you could really see the size difference now this 24 warp that I just did for you is in that 1 millimeter that lovely pink there if I tried to do it in a 2 millimeter that would definitely be a thicker braid all around so but I do think it's possible it's just you just gotta have a little patience with it yeah quick question here what were you were to combine the one in the two I think you could get a one of those dynamic spirals I wonder if it would look very similar to one thing that is like the 12 worm and this is one of the examples I didn't get a chance to show you because it's one of my unfinished pieces but this is a 12 warp where I did the beads only on the outside so you can really see that pop of that spiral there it does look you know kind of organic I like that so you have that blue in the center and then just that pop of the spiral of the gold on the outside so that's another option when you are doing that 12 work so something that might be a little more basic beyond the basics is using some of these by cones and I have three examples here to show you because I wanted to show you the difference and this will actually start to lead us in a little bit to that finishing technique question that we get a lot so this was an example done with eight OC beads and six millimeter bicones here so you have a nice little focal there you get that nice sparkle and you have that sleek finish with the clasp there because this is our magnetic clasp that fits six point two millimeter cord and obviously when you're looking at an S LAN cord that is unfinished you'll have let me see out here this is actually my perfect example here so this is that s line cord so imagine this is coming out here so we do have videos showing you how to bulk up that end so that it actually fits nicely in that clasp because if you have those big beautiful beads you don't want to bring it all the way down so we have this example here that shows you the 800 beads with a four millimeter bicone and then this third example here this uses those four millimeter bicones as well but it uses the eleven OC beads so when I flip this around you can just see the size difference of that class and that clasp is finished similarly to this clap clasp this end cap where it is just a piece of tape but it is sleek and it finishes directly onto the S lon you don't need to do any bulking up as what we kind of call it so usually if this is the end of your kumihimo and let's say this was the end and all the rest of it was beaded and you needed to fit this into an end clasp I wouldn't go with something really small I would try to fit it into something that had a bigger well if you will so this is six point two this is the one that we we favor quite often here and what you can do is you can take that s line and you wind it around and you build up that braid so that it fits and you get some nice C 6000 some glue in there so that it's gonna have a nice sleek finish there a nice class but finished so you can see that in our kits here and let me just pull out another example so again this is that nice eight o bead and then you bulk up the end so that it fits nicely in the clasp so you get that sleek finished clasp and that's our technical term right bulking up yeah that's yeah that's kind of like cuz you big no I don't around build it up bulk it up but that's how that works and I actually did a very separate video showing you how to do that and I did it using this necklace here now let me set aside my kumihimo clusters there for just a moment come on get on the bus there we go so this is one of my favorite designs of late I was really excited to do this and this is an eight warp kumihimo but what happened is I wanted to do something that featured two different colors but I didn't want to have it spiral so I decided to do this little knot here and I had done this bracelet a while back in 11 OC beads and I thought it was just really fun so I just did this lovely little square knot but I did it in a long kumihimo version so actually I can you can take this apart if you want because the knot is it just kind of slides right out but I just did two separate pieces of Kumi you put them together and I added these little tassels to the bottom because I thought that would just be a really nice design element they're very elegant thank you I really I really liked doing that why that was really fun so you can see instead of having a magnetic clasp but we have the toggle clasp here and I love these little end caps here and that clasp this is from tierracast tierracast is a really wonderful brand to use for kumihimo they have a lot of really lovely metal end caps and they just have a little pop of design and that's really all you want because you want to focus on that beautiful braid that you have so just that little tiny design there and a nice little hammered triangle toggle clasp is just really really really lovely so if you're looking for this one on our website this is the berry and blue and I had those beautiful Zola tassels there down at the bottom and those come in several different colors so if you're not into the black we do have lots of other ones for you but that is just a really simple easy square knot now this is kind of a cool clasp but this is a magnetic clasp as well and this actually fits two in there so you can kind of look down the barrel there and see that you fit two different clasps so in terms of poking up here's what I'd say you're a salon if you're using the S on and seed beads it's going to be fairly thin it's going to be about three three point two millimeters depending on how tight your braid is now your braid should be fairly consistent once you get that going but sometimes you don't need to bulk it up as much as you think so you kind of have to feel out the clasp and test the well to see how big that's really gonna be and that's why when we do our braiding we recommend not cutting it off before you build it up you want to build it up first before you cut because once you cut you kind of gotta get your glue ready and put it in there and make sure that it's nice and secure because we don't want that braid to start unraveling because that is a heartbreaker and that definitely happened to me when I first started kumihimo I was just like No so that's what we want to kind of avoid excuse me um let me see what other examples that I have here oh I do want to talk about this so this is a really interesting example if I can draw your attention down to the to spiral class but these are really fun for kumihimo they actually hook on really interestingly you kind of just set it in there and it kind of spirals around and hooks now when you're looking at this one and at this one the thing I want to point out is that the well is a different size so it's the same sized spiral between these two but this one the well is going to be a little bit bigger you can see there and on this one here let me kind of just see if I can get him a little side-by-side there the well on this one is much smaller and I have a little example down here of a hook and I so I have two different sizes of the hook and the eye there so you can just sort of see that the well is going to be a little bit different this is a bigger much bigger clasp that you'd want to use as almost a little bit of a focal for kumihimo but again it has that nice big well clasp to it now all of our clasps listed on the website will let you know exactly what the sizes that you know is on the outside with the well fits so you'll be able to kind of judge so when you are looking at kumihimo for general purposes if you're doing an eight-oh seed bead on an eight warp kumihimo we recommend about a six a six point two that will be about the same thickness as your beads maybe just a little bit smaller because we want to taper down that's just a design technique that I like to focus on if you are not using beads and you want to just focus on these size 18s lon in about an eighth warp even for a twelve warp this will work you want to focus on three millimeters or like three point two so I know that's really specific but we do have a lot of kumihimo projects so go ahead and take a look at that and take a look at what we've listed as our finishing technique and as our clasp and that will give you a little bit of indication for what size you might be looking for to suit whatever design that you're looking for and of course we have our customer service here who is amazing and they can help answer questions and they feel questions to ask so if you do have a design question of hey I wanted to do this with this class will this work what do I need we can do that as well we can help you guys out because we want you guys to have the right fit and the right products oh absolutely okay so that is 12 and 24 were pand we had some examples there before I go into some other stuff I want to toss at Alexander because she's actually going to show you guys how to work with some different kinds of materials and I think that's really fun and that's really for me beyond the basics all right well you've been the perfect instructional part what's gonna happen over here because what I've done is since I'm fairly new honestly to kumihimo Kat will tell you that I have an unusual way of kind of going backwards that I like to start complicated so this is perfect for me but I did stick with the eighth warp and I tried some different materials I wanted to show you so let's look at the table real quick and I'm just gonna do an overview here of what we've got what I started to experiment with was that 1.5 millimeter leather the round leather cord and it also comes in a two so side by side you can see the 1.5 versus a 2 millimeter similar to how Kat was showing you the rat tail but both of these are done with the 1.5 millimeter and 8 warp and use those wonderful end caps with beads and without and so starting starting with that now come over to me and I want to show you this swatch that I've worked up with the leather and I'm gonna flip it over so you can see this is just using scraps we had in the design space so I wasn't really going for a specific project or pattern but what I want to show you is kind of a neat discovery that I have oh I would say about an inch and a half or two actually let me use our well it's hard to get it down there I'm about two inches two inches of weaving now what I want to show you is that when I grip on the center point of my weaving and the end point and pull it actually stretches the weave a bit irreversibly so I wanted to make you aware that when you're working with this that's going to happen and you want to take it into account when you're measuring your B your project and when you're starting to add beads and clasps and having an even even measurement you want to just pre stretch now when I say pre stretch I tried to pre stretch the leather self and that actually had no results at all it stayed the very same length surprisingly it's only once the leather is woven that it has that stretching effect just due to the nature of the weed and the material so that's my main advice there with the leather it's it's super fast to work up and works the very same way with each of these textures and tensions you'll start to get a feel for how how best to pull and tuck and just to give you a visual here of what it's like working you see I don't have bobbins also because it's just a short portion and actually even when they're long they don't tangle the same way that a salon or rat tail might and so with some of these alternative materials I've opted not to use bobbins and that's been kind of freeing as well so as I go along I'll do a little a little bit of pinching just to get my shape mmm uniform and and I did notice something as you're weaving and you can kind of keep weaving as I'm talking and that helps but the board is buckling just a little bit yeah you could use the thicker board for that yeah yeah you for bleeding that I have to sew this that was that's another question that we get after you write thicker board no not necessarily but eventually yeah it'll start to kind of bend a little bit so that's just the difference between the double density and you know if you want to use that but you absolutely don't have to use that right right yeah now I will demonstrate how to finish this off and it's similar to the process Kat was describing so whereas if I were doing an S long piece I could use a scrap of what is already in my bracelet for the leather if I were to tie it with leather it might end up too bulky so I have a portion of s lon that I'm going to use to tie it I'm gonna go ahead and tie it around the base before I even take the whole thing off just to make sure it doesn't fray out on me and that's just going to be a simple knot and this is the same way you would tie it up Julie did a video for us on how to tie it up before you whoops where my knot go before you add beads on for clusters mm-hmm so I'm just going to cinch that up nice and tight get my second knot here and pull and now I feel comfortable just popping off the cords and from this point I can get an even tighter cinch and if I wanted to bulk it up which I really don't because this is so big already I could do the wrapping technique the cat was talking about but I'm gonna go ahead and just continue a couple of tighter tighter knots here and I'm doing a more of a cinching than a bulking but it's kind of the same process so just for good measure I'm gonna flip it over again and do one more knot on the other side oh it's better safe than sorry especially cuz the knots are so tiny you know you're not really like you're saying adding that bulk to it and leathers just a little slippery too so mm-hmm I don't want to wrangle it yeah make sure that braid isn't going anywhere mm-hmm all right so having cinched the end I can bring in my cutters clip off my extra thread knot right against the knot just leave myself a little bit of leeway so it doesn't fray on me before I'm ready to add glue cuz that's gonna go into the well anyway right yeah yep you know I brought in a couple of different sizes of end cap just so we can see which is going to be better for us sometimes you won't know until you cut the material so I'm gonna better safe than sorry have both just in case and I'm going to go ahead and clip off the ends of my leather you could probably use large scissors and do it all in one fell swoop but yeah why not be careful well you do get a really nice accurate cut using the flush cutters and you can trim it down as you need to in order for the well of the cap to really come over everything that you're wanting to cover so you've got some blue over there right yeah here's some e6000 right got a little toothpick here now before I do the glue I'm going to test and see which cap is gonna be best I kind of think it's this one that is really good this is about it well let me measure I think it's an eight millimeter let's see yeah eight millimeter so for an eight warp leather and get this all out of my way here the eight millimeters a good size so I'm gonna dab a little bit of glue into that well we'll just set it in and you do want to really let this set because the larger and bulkier your piece the more likely it's going to pull and have have more wear against that inside so I'm getting plenty of glue in there I'm really going to put it all in and I'll tuck you know what I can take my whole weight off there and just tuck that end in so I would let that sit and then I could put on whatever toggle or s hook clasp whatever I decide to use so that's the leather now along the same lines of experimenting with different materials I wanted to show you the Flex wire which is what I have on this disc here and so it's starting with my sample swatch again you'll see I have no bobbins on this this is the 0.018 thickness and it's the sort of lighter simpler seven strand beadalon right here and so it doesn't have a lot of those steel cords inside for heavy weight it's the very very basic beading wire and I used all the same color of all the same size so that we would get this uniform result and if you see it's got sort of a gentle spiral very very uniform it looks very similar almost to like a very tight Viking knit yeah yeah and so out of curiosity I added beads and you'll see what happened at first was my weave wasn't quite tight enough and the beads sort of they're a little loose for my liking so as I practiced and got the hang of it they became tighter and more uniform and as with all of these you'll just want to get a feel for how it is working with these different materials so that's what the point oh one eight in the seven strand strength now my project which was a real learning experience was me trying to mix different colors of flex wire and so I chose a sterling silver plate in the 0.019 and a black in the point of one nine well I thought having the same size of toward would make it the wires uniform but in fact no it was a very different result using the plate which has 19 strands within it versus the black which has 49 strands within it so they behaved very differently and interestingly gave a result similar to the 12 warp yeah it's it's interesting that the same size but because of the strands inside it does come out a little bit differently you know so it's nothing that you did in the weave it's just how the wire kind of behaves which I find really interesting that was that was a bit of a shock to me because you know you think oh I'm matching the size to the size it's gonna react the same way right and it really doesn't you can especially see it once you add beads I just said it moves on to the silver strands which work four of the eight strands have beads here and it doesn't really interesting stark sort of helix shape yeah so he looks effect that's really cool and we have a video on how to make kumihimo jewelry using flex wire by one of our guest designers Sarah Euler and she breaks down how to finish it off using crimp beads so that was very helpful and just so you know it needs to be a large sized crimp bead of at three three by three millimeter in order to fit all those cords but you don't need to double them all back through i've only doubled two of the flex wires back through the the crimps and then put a four millimeter crimp cover over that in order to transition on to the chain which wasn't really my intention but again it was my my saving of the yeah my my weaving wasn't quite as consistent as I wanted yeah so that was a flex wire and we do have a question yeah absolutely so we do have all of those answers all right so the questions are what beads do we recommend for beaded kumihimo and do we have any tips for getting it on to the cord so one thing is if you are just starting out and want to learn I would recommend starting with a size 18 s lon and using Toho seed beads now Toho tends to be really nice and uniform and if you go with an eight-oh they have little rounded edges but they're still kind of brick-like and that's what we use in our kids and I know I keep going back to the kids but the reason is is because we provide videos that really walk you from start to finish so if you are just starting the kids are great you have everything that you need now the size 18 s LAN will fit very easily onto an 800 bead so this is one of our kit examples here and I pulled this out a little bit earlier and let me just see if I can show you okay so I'm gonna set that there now this is a example of a size 18 s LAN here it's very thin and you can see just how you know it really braids up quite thickly but I have the Toho 800 rounds here and this should be fairly easy to pick up right it didn't take very much but we do have another kit that shows you a slightly different technique and those are our twelve warp kits here now same size s lon but using the Miyuki 11 O's and those are these guys here see I'm so prepared today guys alright so the difference here is that if you find that you're having trouble trying to pick up these little eleven o beads you can see that one's a little tougher and I can kind of get it on there just takes a little extra effort but you can try snipping at your cord at an angle to get a little bit of a needle effect but we also do provide you with an extra little tip so with this instead of e6000 we've given you a different type of glue called super new glue no super new glue is going to be not quite as a high it doesn't have quite a a high viscosity as a 6000 so what happens is you can actually use it to create a little needle-like effect on the end of your esslyn so you can just kind of run that glue over the end and it will kind of create a little needle and then you can snip it at that angle and it will create a nice little stiff angle kind of needle-like effect for you to slip on to your seed beads and we do have a very separate video showing you how to do that there's also another product that we carry which is called instant noodle and it's these two little tubes there and you can just stick your cord in and kind of pinch it and run it out and that's part one and then you do it again a part two and then you have a nice needle-like effect you of course have to let it dry but that's how you can kind of get a little needle on to that now we do have some other kits that have used big eye needles to help you thread and usually you can use that with the 8'o beads it just will be a little thicker because even if you have a needle you're still doubling up your thread so just be mindful of that but if you're just starting out we recommend using the S LAN and the 800 seed beads if you wanted to do that beaded kumihimo but make sure you get a handle on that regular eight warp and I recommend using the satin rat tail it's just easy to use easy to see and it kind of has this little result here you could of course add beads to this as well but a lot of our designs just feature that Toho eight OC bead we have a wide wide range of colors which is why it's so wonderful to start there and you can match up our s lon and we just have just a few colors of our S on here there are so many more we even have color blends that you know you can get all the purples all the blues everything you want there so there's a lot of color choice there as well so size 18 s lon size eight o Toho seed be is where I would start down next to the 1102 hos you've got them ma Gotama beads they had right and those are a different shape yeah these are the Miyuki mega Tamas now these are actually kind of interesting because you have to be aware of stringing it on to your piece in a very specific way because in this piece here you can see that they're all facing one direction on this side and they're all facing the opposite direction on the other side now this goes into another technique here which is adding a large hole bead which I've done here so you can just see side by side now if you kind of peer down the the bracelet there you can see that there's a little bit of that unbe tadesse lon on the inside there and if you're going to do a pattern like this you have to kind of take them off one by one slide it on and then continue your pattern so I know I hear you guys on YouTube you all think I'm crazy I'm fine with that but what I've had to do to create patterns like this and to keep it going is you have to number your bobbins and you can actually see that I've done it on a couple of mine here I have my traditional eight but here I have little this is just some blue painters tape you can get from a hardware store nothing crazy it just doesn't provide any sticky which I like so I leave it on here and I just number them one two three four and all the way around but the reason I do this is because if you ever get lost and you do you know especially when you're not working with a multicolored situation here if you ever get lost you know where you started and that can also help be indicative of a pattern that you wanted to start so as you're kind of working through that way that will help you especially in the beginning when you are kind of figuring out where all of these things are gonna sit and usually I just start at one and kind of work my way clock right clockwise around and just number them so like I like I said I know it's crazy but it has saved me so many times to do that when I'm trying to create a pattern so that I remember what bead goes on what bobbin especially if you're doing an irregular pattern like you can see here this is that graduated pattern and it is so sporadic throughout here that you really do have to be careful about what number bead is which court and how they're all gonna sit together it's very specific in order to get that graduated pattern just like that mm-hmm no I do want to say and I want to address something that I did in the instructions for this particular necklace here now this necklace is a really long necklace beautiful love it mine I love it mm-hmm but what I did is this rasberry piece here this is a really long piece and it needs 200 C beads per bobbin so uses a lot of seed beads to create this and one thing that I noticed is that when I started to string on all 200 I couldn't wind it all in the bobbin it was too much it was too heavy so what I had to do is I had to do 100 and I'd string until I had like one bead left on each and two beads left on one and then I would unwind the bobbin string out another hundred and continuing my weave because my bobbins just were small enough now we do have the big huge bobbins that you can use and if it holds great mine just had too much weight that I found for me personally to be able to work effectively so that's just another little tip for you if you are focused on doing something that is a little bit of a longer piece a bigger piece but if you start on winding those bobbins and restringing you want to make sure that you know which bobbin you're working with now this is a solid color but if you are trying to do a spiral a pattern you don't want to go oh shoot what number was that where am I so if you have it listed and you have your pattern it will save you I promise it's that one extra little step from designer to designer please do it alright so that was my other little tip here with this guy is don't be afraid to blind your bobbins unwind your bobbins it's not like beaded crochet which actually has a very similar visual result to kumihimo and we get that question a lot oh is that crochet or is that kumihimo but that is kind of that difference there is that you can unwind your bobbin add more but with you're doing beaded crochet you kind of have to pre string all of them and then kind of you you're doing your your crochet your spiral so speaking of even bobbin is another kind of bead that we use on kumihimo is the large hole bead and so down where Kat was indicating before this one with the ma Gotama is a great example with the butterfly in the center and then the one right beside it has beads with the large hole european-style and so when you're talking about taking your bobbins off and adding more beads that's the process which we have a couple different videos on for how to incorporate different sized beads that way yes absolutely oh we do have another question you're asking me to do math my question is what's the largest number of warps you can do on a 32 slot disc I have done up to 16 when I when you do the 24 I would bump it up to the 64 I don't I will try to do like a 20 or 22 to see how that works but the highest I've done is 16 because you do have to have open slots for things to move around and for place places for new warps to go because you can't occupy the same space with a different warp that makes sense to you so when I go to do my video for the 16 or I will try and I will test that out but I know 16 works if you are doing the square kumihimo or the excuse me the flat kumihimo with the square disc instead of the traditional being an eight warp your traditional is a 10 warp because you had those two on the side so it behaves a little bit like a excuse me a 12 warp so you'll have like your ones that go up and down and then your criss cross to kind of create that flat now that's actually something that is something I want to try with the wire yeah because I think that could look really really neat and I think I've seen it done before and it's just it's such a beautiful result it really gorgeous yeah I'm so in everybody at for us we definitely want to get into that meanwhile I've experimented with the round it worked for me mo with wire yeah I can show you the result that I achieved with that and so I used for instance this necklace with the focal has four different tones of 22 gauge wire and it just creates sort of this organic round knit almost like a Viking knit if you're familiar at all with that process of working wire around a central dowel but in this case you're just you're doing the exact same process as eight work kumihimo with any other material and then another design came up with was this one with a 24 gauge wire in a loop earring so videos on this one and also another loop earring design using cord ends to loop around a Fogell so I've got that video up as well so yeah it's just trying some new different things of course we always love to showcase our chain kumihimo which we definitely want to experiment more with as well and this uses a wrapped wire loop technique that is very similar to what I needed to do to get the wires up into that capsule end cap so I definitely wanted to touch on those with you and I love that chain kumihimo that is just really you can yeah you can still see that spiral in the black and gold version and the silver and gold version is just so cool it just looks so woven and just really really beautiful very straight rich yes so there's there's lots more to do with this especially with the flat kumihimo the wire more with the chain I would love to do an advanced kumihimo class yes if anybody's interested I think that might be coming I feel like we're almost out of time and there's just a lot more to talk about yeah and you know what if you guys like I said if you're interested in trying kumihimo we recommend our kits it's a great place to start and then you can really start to feel comfortable and experiment you know because when you're looking at it kumihimo is just cords and beads and then you can start adding bails and you can do clusters and you can do all kinds of different finishing techniques you know a lot of the finishing techniques that we at beadaholique use do involve glue but not all of them have to you know so there is just various other things that you can do and this was actually another question that I had and I'm sort of gonna use my little scrap here to show you so if you didn't want to use any glue and you're okay with it looking a little organic here's a little tip so in set of cutting let's say let's say this is an eight warp kumihimo just for argument's sake if you had your eight chords and you had them all separated you'd have two ends that look like this that are all frayed like that right but let's say you cut four chords and bent them together so you end up having what will hopefully be a much larger loop like this well what you can do is you can finish off your chords with a big beautiful knot there and just kind of slip that through and it'll kind of look a little bit more like a friendship bracelet so you can get that type of finishing as well if you don't want to use any glue whatsoever so that's an option as well you know I there might be some fun that you can have with maybe a button or something like that so we'll time it will kind of test out some more finishing techniques because we do get that question quite often and we want to be able to show you guys that so oh and speaking on finishing techniques this is another happy accident that happened for me with its bracelet you can see that the the woven portion ended up rather small and so I added an extension chain a chain extender which we hadn't done yet with kumihimo but it for this type of technique that is so labor-intensive if you are making it for gifts or selling it to me it makes sense to have it be adjustable right and so that's a good option and you can even see down there on the flat but instead of an end cap you have a ribbon ribbon crimps yeah so that's the end piece there so again kind of a different thing now in my opinion the ribbon crimp kind of only works if you're gonna do the flat kumihimo mm-hmm but you have that option down there as well yeah alright so let's get your last comments in last questions cuz we'll still be able to answer questions for you once our life EDA is done here because we are going to be posting this on our YouTube channel so get your last comments in for our giveaway so we're gonna announce our winner here in just a moment and if you guys are new to us here we are an online retailer we sell beads but we love doing tutorials and projects to show off those beautiful beads so we do have a youtube channel and if you're new there please hit that subscribe button and that notification bell so you guys can get all the latest from beadaholique and we are just so excited to be able to do this so if you guys ever have suggestions of things that you might want to see or something that you're struggling with and you know you're not really sure let us test it out for you because we love doing that so leave us a comment had you know interact with us on Facebook and Instagram we are there we are answering questions for you guys all the time so don't feel free or you don't feel bad to reach out it's like hey I'm having trouble threading my needle we might have a tip for you you know so it can be something as simple as that there are no silly questions so please reach out to us on Instagram Facebook and of course YouTube alright Brian do we have a winner picked up all right congratulations to Kelly Carter you are the winner today so you are gonna take home at this beautiful giveaway and you are gonna get these 64 slot discs you're gonna get one of our brand new kits that just launched today you're gonna get a kumihimo weight some s LAN core and some finishing pieces and of course our beadaholique bead mat so congratulations Brian all you need to do is email our service team here and that is serviced at beadaholique.com and you will be you will get your information we'll send this out to you so happy New Year to Kelly Carter your first giveaway of 2020 so thank you so much for joining us here guys this was really really fun and I do think that we might be interested to do more kumihimo probably do an advanced class at some point so if you're interested in that please let us know or if you have another idea for a class let's not alright thanks so much for joining us guys and have a wonderful weekend and we'll see you back here soon bye you

Customer Reviews

Based on 6 reviews Write a review

You recently viewed

Clear recently viewed