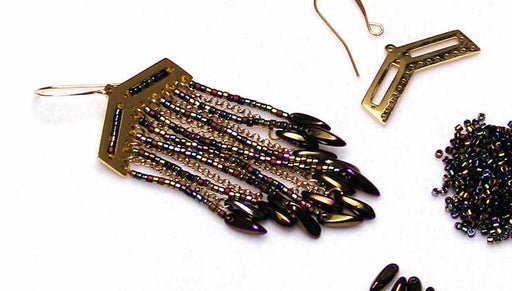
How to Use Cymbal Bead Substitutes and Side Beads in Bead Weaving

SKU VID-1664
Designer: Kat Silvia
In this video you will see how to use the Cymbal bead substitutes and side beads in your bead weaving projects. You will learn how to construct the Ithaca Earrings using the 2-hole Hexagon Honeycomb beads.
FEATURED IN THIS VIDEO
Audio Transcript
Note: This audio transcript is auto-generated and may not be completely accurate.
Hi, this is Kat with beadaholique.com and this is a great example of what those beads substitutes are so you can see that I'm using the honeycomb beads here and then I had these little bead substitutes so all they really are is a metal plated bead that's gonna substitute one of those colorful beads there all right so I'm gonna show you how to do this but let me start and first draw your attention up here I want to start by talking about some of the options here so these are the two whole silky beads here so I do have some bead substitutes but when I talk about side beads this is what I'm talking about so you can see that it has a little curve on one side there and then it has one hole that is drilled through the side so if you kind of see in my little example here you can drill this on to the side and you can sort of continue to build up your pattern I'm just placing these of course your pattern could be much more complicated than this but what's really nice is as you're drawing your thread up through there you're not gonna have any thread bridges on the outside because you have these really nice metal side beads so that's just a really fun thing to do and they come in a couple of different shapes here even for these silkies so let me see if I can kind of nudge that in there so you get a little visual of what that guy looks like so we have that little flatter side and then we have that nice rounded side and then also as you're thinking about finishing off your pieces here's a great little clasp and this is a little magnetic clasp for the silky beads so it has that beautiful same shape and you can just kind of continue your design and this is a really nice way to finish off your bead weaving and keep everything nice and consistent and just beautiful so those are the silky beads now over here again we have those honeycomb beads and we have a couple different styles I love this antique silver one with a little flower on there and then we have these dimensional ones and they are one-sided so on the back they have a little flat side so you could utilize that one as well and then we have the gem duo's now these ones are kind of fun we have some different little styles here and this one here this actually you can fit a little crystal inside there so you can actually add a little crystal embellishment to your bead weaving and again we see those metal clasps and we have also their own version of a little side beat it looks very similar to that silky bead it's a little more shallow and it fits with those gem do is on the side and then we have some more little side beads here that you can utilize and let me just kind of bring a couple of gem duo's down here so you can put them like that I'm just sort of use those on the side just to finish off your bead weaving and you can add a little extra embellishment on either side you can also sort of put it into the center there if you want it to if you want to add some more seed beads so that's just a little option there when you're working with the gem duo's moving right along we have the half teyla's and the full Teela's but let me start with the half first now these are those beads substitutes and I just love how it's so nice you can add that little pop of metal and you don't have to use a lot for a big impact so let's say you're making a bracelet maybe it's brick stitch with the half Teela's or peyote stitch or something with these guys and you can just sort of add it in and you just add it like any other beads there's no extra sort of technique or anything here but what's great is that we have the little side beads too now when you're looking at the side bead for the Tila the full Tila and this will work for the half as well because of the way that they're drilled they're basically just cut in half down the center but these are actually really cool because you can add a little you know bridge of seed beads on the outside or you can add a crystal or you can add another bead and let's say you put another one there so there's just a lot of fun things to do and I love these bead substitutes here they have you know little dots on the top and little squares and also just that nice little metal finish so a lot of fun to be had with those all right now we love using super duos here at beadaholique so I just put a couple of those little super duos and to show you just how sweet it locks in there and it's so nice you don't have to add anything to it you can just keep your design going and those little ends there are gonna act like little buffers to the other superdude so let's say you how to wider piece and you just end it with jetting out superdude you can totally put that in there there and I just think that's so wonderful also if you wanted to you could actually end it with a nice little metal bead substitute and then you have a nice clasp that looks metal all around so if you didn't want to put that bead in there depending on what color you're working with so that's one of those little super duo bead substitutes so just something to consider there all right we have a little flower here that goes with the Miyuki 11o rounds and I'm just gonna kind of flip it over now this kind of looks a little bit more like a button shank and actually let me try to pick this up so you can see it a little bit better so this looks a little bit like a button shank there and what I love about this is that it just kind of sits on top of your bead weaving and just adds a little something so imagine my fingers are the bead weaving so that's just gonna sit right on top and flush there and create a nice little little pop there a little flower I have to clasp to magnetic clasps that work really great with the Miyuki 11o delicas just because of their cylindrical shape we're gonna fit really nicely across those little beads there and then finally I have some 8'o Toho seed beads and these are gonna work great with these guys here so again I have a little bit more of that button shank and you can see on this one that it is larger so it does fit with those 8o seed beads as opposed to that 11 oh and I'll just kind of show those side-by-side there so you can see that one has definitely got a bigger shank so those are gonna be for our 8 oh and I love these ones because you can add a little flower you can add some cool metal studs we have the round ones and the square ones and then we do have these little bead substitution things here and these are to hold but they're gonna work great with those 800 beads as well alright so let's make a little project with this so what I wanted to do is I brought out some of the symbols and these are more considered clasps or finishing pieces because they have those nice little loops they're more bead endings but I wanted to kind of incorporate those into a nice little sleek design and what I love about this is you don't need any extra seed beads you don't need any extra jump rings you can just make a full earring just with these four ingredients so I have some of those beads substitutes in gold and then I have my honeycomb beads and then I have my end piece here and of course my earring hook so the only tools that we're really going to is just a pair of scissors and then I have a pair of chain nose pliers and round nose or excuse me two pairs of chain nose pliers to just help me open that loop but then what I have unmade two needles here we're gonna use a double needle method and this is gonna make it just really really fast I'm going to be using the fireline in the smoke color so that you get it to show up here but I just want to show you in my example because you are gonna get little tiny thread bridges and I don't even know if you'll be able to see this I did use crystal fire line just because of the colors that I chose so but I am gonna use smoke here just so you guys can see what I'm doing alright so let's go ahead and kind of get this started what I'm gonna do is I'm gonna take two needles here and I'm gonna pick up one of those beads and I'm just gonna take one needle through one hole and one needle through another hole and I'm gonna string that down and let that sit in the center of my thread now just go ahead and separate those out there we go and now I'm just gonna pick up one honeycomb on one and one honeycomb on the other and slide that down and then I'm gonna pick up one hole of a gold honeycomb and one hole of the other there we go and I'm just gonna kind of bring that down keeping it nice and in the center here we go alright and I'm just gonna repeat that picking up one hole of one one hole of another and then again picking up one going through one hole and going through the other yeah I'm gonna go ahead and string that guy down there we go and one last time picking up one hole of one honeycomb and one hole of another and stringing that down alright so now is where we got get to add our little topper so the cool thing about these guys is that it's not drilled from bottom to top anymore even though there are the two holes on the bottom but what happens is your needle will actually go through one side so we're gonna crisscross our thread through and go through one side and then crisscross and go through on the other side so now I'm just gonna pull that down just like so alright so now with my right needle I'm just gonna go all the way back down through all those little beads that I strung and I'm gonna go all the way down and I'm gonna stop when I'm exiting that bottom blue bead right there and just go ahead and pull that all the way through all right set that aside now I'm just gonna repeat that whole thing with the left hand needle going down through that left hand side all the way down all right so I'm just gonna give it a little tug make sure everyone's nice and tight all right so now I'm gonna create that thread bridge and I'm gonna go back up through that second hole of that bottom blue bead and now what I'm gonna do is I'm going to pick up one of my gold honeycombs and I'm gonna go through that next one now because these are double-sided you want to make sure that you are picking it up on the right side and you'll be able to tell right away just like so and then I'm gonna pick up one of the blue honeycombs and go through the top here all right and then I'm just gonna turn that around one more time and go through that first blue bead all right so I'm going to set that aside so you guessed it we're just gonna repeat on the other side and I'm just going to kind of turn this around because I'm right-handed here so we're gonna again just go up through that first hole in that blue bead there we go and then I'm gonna pick up one of those honeycomb gold beads and go through that next blue hole and let's make sure I picked it up right yes it did all right and the honeycomb beads themselves are not double-sided so you can pick those up on whichever side because it'll kind of flip around there for you all right and then I'm just gonna turn it around and go back down through that first blue bead all right so now what I want to do is I'm just kind of tugging on my thread I want to make sure everyone is nice and snug as a bug in a rug and then I'm just gonna take my needle and I'm gonna go through and around the back because what I'm gonna do is I'm just gonna tie off a little knot there and that's good just gonna kind of sit right inside there and I'm going to do the same thing this other side here just go down make sure you're catching that thread bridge create a little loop and pull that nice and tight all right so now I'm just gonna take my snips you can also use a thread zap for this as well and just kind of come in there and snip off those those threads set that all aside all right and finally I'm just going to come in with my chain nose pliers here and I'm just going to use my fingers I'm just going to bend it you don't need to bend it too far because we're just gonna slip on our earring and close that back up and there we are we are all done not bad right not bad it a quick little easy project and I love those little added metal elements there I think it just makes it really fun it's a great way to just add a little pop a little shine to your bead weaving I hope you enjoyed this video you can get all of these supplies and see even more tutorial videos by heading over to beadaholique.com

You recently viewed

Clear recently viewed