How to Taper Loom Weaving using Smaller Seed Beads

SKU VID-1774
Designer: Alexandra Smith
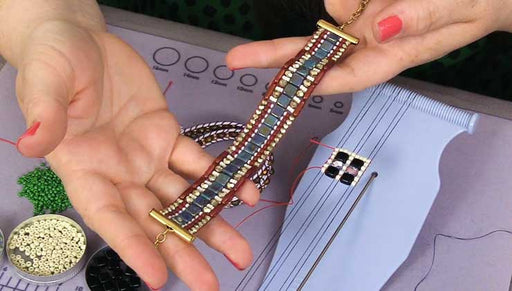
In this video, you will see how to incorporate graduated sizes of seed beads into loom work to create a tapered or scalloped effect. This technique accommodates an assortment of clasps and finishing components, while also offering unique design possibilities.
Audio Transcript
Note: This audio transcript is auto-generated and may not be completely accurate.
hi this is Alexandra at beadaholique with a tip for you on how to taper loom weaving using smaller seed beads so here I've got the baby jewel loom and on it I've created a little swatch of bead weaving and this uses three different sizes of beads I've got 11 o 8 o + 6 o beads in graduated order and so this offers design possibilities for creating kind of a scalloped effect in your bead work or for a finishing technique to accommodate various sizes of clasp and so in this bracelet here you can see that's what I've done where my six o beads we're going to be slightly too wide for a larger class I didn't have the right size so I've got this smaller size that tapers down into a NATO bead within there and that enabled me to use this nice sleek 13 millimeter clasp on this bracelet so I wanted to show you how to start that technique here and I'm just gonna pick up on to my loom needle five eleven o seed beads you'll see that I have some 9mo thread that's on this loom in a six warps and so I'm gonna take these five beads and just kind of space them out on my needle so that they fall into the grooves of those threads once I have that in there I'm just gonna press them up with my finger whoops always tricky to get that first row especially when they're the smaller beads because you'll notice that I have each of the warp threads every two grooves and that's to accommodate the larger size needs that will be going on as well but you'll see as I add these eleven O's that once we get into it it'll cinch them up in a way that tapers let me get through here coming under and then over to trap those beads and you'll notice they're a little loose but they are try on the threat as they should be so the next size up will be the a doe and I'm just using some contrasting colors here so that you can see and so I'm going to bring those up underneath and again track them between my warp threads slide them up against my previous row and pull the weft thread through I'm gonna double back to secure that row coming over the warp threads and I've got my second row make sure those are straight and I'll take on five of these six o beads bring them in and slide those into place as well I think I've got an extra bead there we go get those tucked up to my previous row and pull the weft thread through double it back and tuck those rows together and you'll see when I tug on these threads that I can cinch up the warp threads so that they once tied in a knot will keep their shape and that's also illustrated here in this example where I've done multiple rows of each size bead just to give you a sense of how that turns out once you start into the weaving so that's one way to taper bead weaving on the loom for various design ideas or finishing techniques you can buy all of these tools and supplies at beadaholique.com and be sure to subscribe to our YouTube channel click the notification button then we have new videos every week thanks for joining us

You recently viewed

Clear recently viewed