Audio Transcript
Note: This audio transcript is auto-generated and may not be completely accurate.
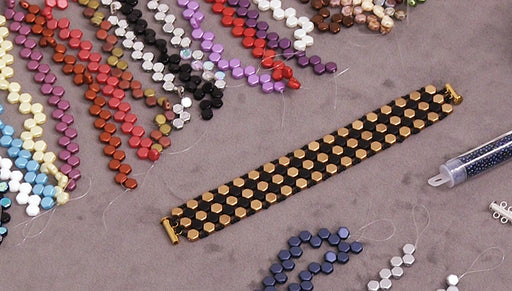
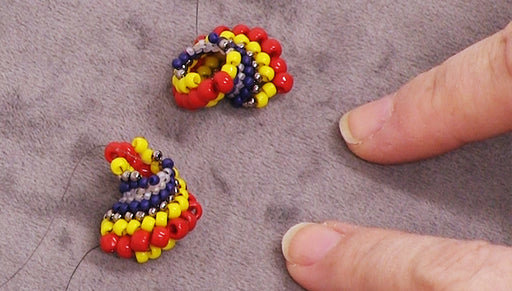
Hi, this is Kat with beadaholique.com ski bicones Touhou 11 OC beads as well as the checkmates brick beads and two whole square beads so it's just kind of a fun little bracelet and this is a much more colorful version that what I'm going to do today I'm gonna do a little bit more of a subdued if it just a black and gold today so just let you know what we have here again it we have the eleven o Toho seed beads I have some four millimeter bicone Sourav ski crystals the two whole bar beads from checkmates and the two whole square beads also from checkmates I have two five millimeter 20 gauge jump rings and a clasp a magnetic clasp pair I'm going to be using the fireline in the smoke color and this is the point 0:06 I need two needles and I'm going to be using size twelve beading needles today I have two pairs of pliers to help me out with those jump rings and then I also have my trusty thread zap so if you're ready to begin let's get started okay so to begin we're gonna start with the center row here so go ahead and get your needle and thread ready and you're gonna need probably about ten feet or so of thread if you find that that's not enough and you need to do a longer bracelet go ahead and lengthen that amount of thread you can also tie off and add in thread and we have a video showing you how to do that as well I'm gonna need my two needles here and go ahead and pinch that end there just making it nice and flat easier to thread and go ahead and pull it down maybe a foot or so maybe two feet just to give yourself some room to work you can adjust that as you work again just pinch that little end and we're gonna thread my needle there yeah okay so now I have my thread all set to go and you'll notice since we're starting with the center row here I'm gonna start with these beads over here and it's magnetic attached to my needle so we're going to pick up 12 11 o Toho seed beads okay so I have two seed beads or so yeah I have 12 to hoe seed beads and I'm just gonna slide those down all the way to the center of my thread there so now what I'm going to do is I'm going to pick up one of the brick beads onto my right hand needle and I'm just gonna slide that down and what's going to happen here is it's going to come around the side so this is the orientation that I want it to kind of lay and you'll see that it's just a little tricky in this beginning portion I'm going to pick up one more Toho seed bead on my right hand needle and another brick bead and I'm gonna go ahead and slide those down so what I'm sort of creating is my own little square bead right here okay so now I'm going to take my left hand needle and I'm just gonna go back down through the brick bead one seed bead and at the other brick bead so you see how I'm just going right through there okay and now just pull that through and now I'm going to switch my needles they're on opposite sides now so this is what I have this is my little loop that I've created right here okay so now I'm going to pick it up and I'm going to create a thread bridge and go through this hole here on the on the brick bead I'm going to pick up one Toho seed bead and go through the next hole right there and now I'm coming out this side so I'm going to go ahead and put my needle over here and now I'm just going to take my left hand needle and go through all three and pull tight okay you always want to pull tight on your work here to make sure that it is going to be nice and secure okay so this is what we now have so now on my right hand needle I am going to pick up one Swarovski four millimeter bicone one seed bead and another bicone and I'm just going to slide that down and now on my left hand needle I'm gonna pick up one bicone slide that all the way down and now I'm going to go through this seed bead that I already strung and this is where it gets a little tricky in the beginning because you're going to want to keep that left-hand needle on the left hand side so you'll watch it kind of flip around a little bit okay so now we're starting to get that little flower shape in the center and now I'm just gonna take my left hand needle and I'm actually gonna thread it on myself to get one more bicone and slide that all the way down so now we have this happening okay so again all you're going to do is just sort of repeat that process here so what I'm going to do is I'm going to pick up one bar bead one Toho seed bead and another bar bead slide that all the way down and moving that right-hand needle over taking that left-hand needle now and going all the way back through the bar bead the seed bead and the bar bead and you might just need to kind of move it around just to get it to sit properly there we go all right I'm not really happy with the way that's sitting she can just kind of move it around with your fingers there we go okay so now again I'm going to take that needle and go back through here pick up another seed bead to complete my little unit move my needle over and go back through here and I really want to take the time to kind of tighten up that work right there make sure that everything is going the right way and sitting properly there we go so you're just going to continue on in this manner and again I'll show you one more unit quickly so one bicone one seed bead another bicone slide it down on the left-hand needle one bicone go through this seed bead that I've already strung and add on another bicone keeping those needles separate pull that down until they meet in the middle there we go okay there we go all right now I'm just gonna continue with my bar beats up here and when you get to your desired link we'll turn it around and we'll come back okay so I'm just going to do just a little section here and I'm going to show you how to do the next part assume I've come to the end piece of my bracelet so now I'm going to repeat what I did over here and just pick up 12c beads two four six eight ten and eleven and twelve go ahead slide this down and taking my left hand needle I'm just going to go back all the way through all those seed beads and you can see they're just coming together there okay and you can tighten all that up because you're going to go down through that first portion there and loop around one more time just for a little extra security right through there and I'm going to take my other needle and do the same so go down through and just through there okay so now you see where my threads are coming out they're coming out of that second hole in each of those brick beads so now I'm going to add on the top portion so go ahead and take your right hand needle and you're going to pick up one seed bead one of the two whole square beads and one more seed bead that town and this is just going to sit on top of where your bicone is so now you're going to take your needle and you're gonna go down through the three holes there of your brick bead and you're gonna come sorry I'm getting my threads all around me there okay so this is what we have on this side now you're gonna take your left hand needle for the thread that's coming out right here and you're just going to repeat that on the other side so one seed bead one two whole square bead and one more seed bead again you're gonna criss cross and go through that hole right there going through all three seed beads so you're all right and now we're going to criss cross one more time go all the way down through here and take that left hand needle and criss cross going through those next stones okay so now you're coming out of these two holes right here and you're just going to repeat that for as long as you have your bracelet so again I'll just show you really quickly one seed bead 1 square bead one seed bead skipping over and going down through that first hole there and you can actually do this all in one step if you like and just immediately turn your needle around and just go back and just repeat on the other side one 201 square and one seed bead make sure as you're weaving that you're not catching any beads or thread bridges that you're not supposed to be okay so I'm gonna finish up doing this last one and then I'll be right back to show you how to put the final touch on it okay so now I've added all of my units and I'm going to take my right hand needle and again I'm just going to go back down through and now I'm going to catch that seed bead that's right there on the end so I'm going through all four beads right there and only the four not that first one right there and I gotta lengthen my thread a little go and now I'm going to pick up two seed beads and I'm going to go through the outside hole on my beads here just make sure that's nice and tight there we go okay so now I'm coming out of this square bead on this sort of left-hand needle now and I'm going to take the other side and repeat that so I can move my needle to this other side and again I want to catch that last little seed bead and I'm going to pick up two more and go through that square beads right there okay so now I'm going to go through and just add a seed bead and a bicone in between each of my little units here so pick up one seed bead one bicone and one seed bead and very simply you're just going to go through the next unit there one seed bead one bicone and one seed bead through the next unit and when you get to the end you're going to pick up two seed beads and now you're going to do exactly what you did before and you're going to criss cross all the way down to the other side here so let me just show you on the other side and I'm gonna flip it around a little bit just because I'm right-handed so picking up a seed bead a bicone and a seed bead going to go through that top bead or the top hole on that square bead one seed bead picking up one zb1 bicone and one seed bead going through that top hole there and now I'll show you one more time I'm gonna pick up two seed beads go through that seed bead the one below it and coming out so you pick up all four beads there and now you've criss-crossed and now what you'll do is you'll tie off your threads and weave them in and again we have a video to show you how to do that but I'll just do one really quick right now so I'm gonna take this thread and I'm just going to weave it down here just to give a little extra security to that clasp area and I'm just gonna make a little loop pull my needle through and make sure it gets nice and tight in there and you can just kind of weave through the next couple of beads or so and now I'm just going to zap off that thread so that is how that looks all nice and finished and then to put my clasp on here I'm going to just open up one jump ring using my chain nose pliers hook it on to the end there and attach my clasp and all I need to do now is close up that jump ring and that's it and you'll just repeat that exact same step on the other side to finish your bracelet so that is how to construct the veracruz bracelet it's a lot of just back and forth with your needles but I hope you enjoyed this video and you can find all of these supplies and more at beadaholique.com you

You recently viewed

Clear recently viewed