How to Make the Brick Stitch Burst Earrings Kit by Beadaholique

SKU VID-1873
Designer: Kat Silvia
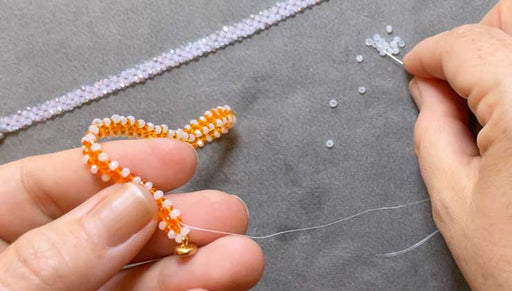
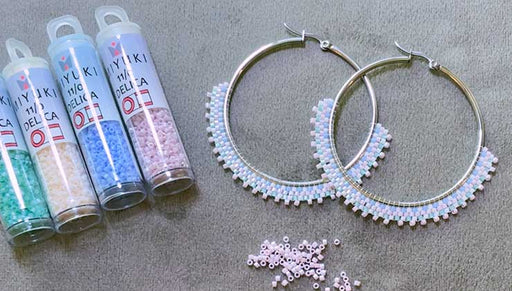
In this video you will learn how to make these earrings from start to finish. These earrings are done with circular brick stitch and finished with a splash of crystals around the edges. Complete the look with a jump ring and earring hook.
Audio Transcript
Note: This audio transcript is auto-generated and may not be completely accurate.
hi this is kat with beadaholique.com and in this video i'm going to show you how to make the brick stitch burst earrings now these are an exclusive beadaholique jewelry kit that you can get at beadaholique.com and today i'm going to walk you through step by step how to do each step of this kit so if you're unfamiliar with circular brick stitch this is a great way to learn with our step-by-step instructions so we have five different colorways here for you today we have three in silver so we have a beautiful pink a nice green and a blue and we also have two options in gold so we have a purple and an orange so all you need to do is choose your favorite and like i said you can get these over at beadaholique.com and you will be supplied with everything you need including a beading needle the only thing that you'll need to provide yourself is a pair of chain nose pliers and a pair of round nose pliers now you can use two pairs of chain nose pliers if you like because that's what's going to help us out with our little jump ring there and you'll also need a pair of scissors or snips to help you with your thread but if you have everything ready to go let's go ahead and get started okay we are now ready to begin our bead weaving so i've strung my needle with four feet of the fire line and what i'm going to do is i'm going to come to this end here that doesn't have the needle on it and i'm going to pick up one of my little rings here go ahead and slide that through and you'll want a tail of about four to six inches or so and we're just going to tie a simple overhand knot and bring that right down on top of our bead frame and let's just secure that so we're going to do one more overhand knot just bring that around and through all right now give it a nice good tug we want to make sure that is not going to go anywhere all right so we have our tail coming out one side and then to this side this is where we have our needle attached now i'm going to start with the white beads here so go ahead and start by picking up two of those white beads and i'm just going to slide them all the way down here to the end and what we want to do is we want to get them to sit next to each other so i'm just going to kind of fold that over and i'm going to bring my needle from the back to the front and now take my needle up through that first bead right there that's next to my needle and now i'm just going to pull that through there we go and you can see that i'm just kind of situating it with my thumbs now so we have two little thread bridges there and i have my tail coming out this side and my needle is now coming out the top of that white bead so now i'm going to pick up one more white bead string that all the way down let it fall and again you kind of have to help it out a little bit to kind of fold over and the same thing you go through the center and up through that bead and pull pull pull and i always like to kind of especially to get these few situated just kind of work with my fingers and just give it a nice little tug make sure that's not going to go anywhere all right so let me show you that one more time but we're going to do this all the way around this ring and go down through i'm kind of doing it all in one quicker step here just kind of hold it with your fingers and up and continue so now we're going to continue all the way around this ring and you will add 30 seed beads to this first row so continue to do that and when we get to the other side i'm going to show you the next step okay so i have added all 30 beads here and before i move on i want to show you a little thing and you can do this or you can just kind of cut it off here if you want but i'm going to take the little tail here and i'm going to string it back up through that very first bead just to kind of get it out of the way see if i can do this without my needle it's entirely up to you if you want to do this piece you can also like i said just cut it off but i'm just going to kind of string mine up through that first bead and just get it out of the way all right now i'm going to flip my work over here so my tail is coming out this side so here's my needle now to connect this i need that thread bridge between these two beads here so what i'm going to do is i'm going to sew down through that bead and bring that together and i'm going to come through the center there and i'm going to bring it up through so that i'm going right through that bead now you'll notice i have a little gap there what you can do is just kind of wiggle the beads together to close up that gap give it a nice little tug here and that gap kind of goes away because you won't really have enough to add a 31st bead it will become too crunched so we kind of have to just wiggle it around just like that all right so get my tail out of the way one more time now we're ready to start adding the next row so we're going to go with this lighter purple here so same thing go ahead and pick up those two seed beads string them all the way down here to the bottom and now instead of going through the center there what we're going to do is we're going to go underneath that very first thread bridge right there and bring your needle through and now they set very nicely there for me so i'm going to go up through that last one there that i strung and now we're ready to continue our bead weaving so now it's going to look very similar so i'm going to pick up one more of those light seed beads i'm going to go underneath that next thread bridge there so this should all look very familiar now i'm going to add a few beads here and i'm going to talk you through this because this can be tricky for a lot of people so what i want to do is because i'm adding a row that's going to be larger and actually this second row is going to be 35 beads i'm going to need a couple beads to share a thread bridge and i'll show you what i mean so i'm going to get to about my fifth bead here and i'm already going to have to do it so what you'll see happening is that bead that last one there wants to kind of sit a little more cockeyed so what i'm going to have to do is just help him out a little bit but you'll notice that i have a big gap there with that extra thread bridge so what i'm going to do is i'm going to pick up another seed bead and i'm going to go through that same thread bridge right there and again you're just going to kind of have to help him out and then put your needle up through there and now you can continue on to the next thread bridge so you're going to have to do that a few times here and just let the beads tell you where they want to go these delica beads are pretty uniform however some of them do tend to be a little higher or you know they're a little cross cut so just follow along and like i said you're going to add 35 beads to this next ring so continue to do that and i'll be back on this other side to show you the next step so now and the same way we're going to add one more and i'm going to come under this thread bridge here to complete my 35 again same technique going up so there's my last bead and now with this one you're going to just go and i can try to get it in one so i can kind of go under that first little thread bridge there come through and then go up through that little bead there so it's the same technique you're just not using the ring anymore you're using those thread bridges all right and now i'm actually going to take a moment here to bring in my scissors and i'm going to snip off this little tail here he is officially getting in my way but since we've already tied him off earlier we don't really need to add any more knots to that now so your p should start to look like this now we're going to continue and start again with the darker purple beads again going under that thread bridge and this will look very similar to that second row where you'll have to add your extra beads so for this third row here with the dark purple we are going to do 40 beads so we just continue on in the same manner that we did before alright so i will meet you on the other side and go ahead and complete that and then we will go through how to add on that beautiful row of crystals okay so we've completed that last little loop there at the top so now we are coming out of that purple bead right there so to add that row of crystals we're going to use the white seed beads so i'm going to pick up one white seed bead and one crystal and one white seed bead now instead of going into the adjacent thread bridge we're actually going to skip over this one and we're going to go into the next one there so we are going to go underneath and catch that last little thread bridge right there pull that through and now the same brick stitch style we're going to go up through that white seed bead that we have right there just like so so now we're going to pick up just a crystal and a seed bead again skipping over that first thread bridge there that's right next to it and going underneath that next one pull through and now go up through that last bead right there and we're just going to continue in this manner going all the way around until we've added 20 of our crystals and when we are done i will show you how to finish it off and we're going to finish it off and we're going to add that earring hook and we are going to be all set and ready to go okay so we've now gone all the way around here and we are back to this point here so for instead of picking up a crystal and a seed bead just pick up a crystal and we're going to go into this seed bead and we're going to do kind of the same thing that we were doing earlier we're just go down through that one seed bead come underneath to catch that thread bridge and come back up through that seed bead there and pull tight perfect all right now we are going to go through the next bicone bead that's right there the next crystal and what we're going to do is we're going to pick up one of our white seed beads and we're just going to go directly into the next crystal because we need a seed bead to be horizontal because this is where we're going to attach our jump ring now to tie this off go ahead and sneak your needle underneath there come up through go through that little loop and tie your knot now just go down through one seed bead here and if i can i like to go down through at least that next row there and pull tight now you can come in with your scissors or snips or if you want to use a thread burner you can do this as well and just go ahead and cut that off all right now our next step here is to add on our jump ring so go ahead and take your chain nose pliers and your round nose pliers here or you can use two chain nose pliers give that jump ring a nice big open gentle little twist and slip it on to the seed bead here now you'll just need to kind of sneak it in there but it will fit through that seed bead just like so and before we close that up we're going to slip on our earring hook and you can go ahead and set our pliers aside and we are all done so we now have one earring complete go ahead and repeat this entire process to get that second earring and you are all done so you can get all of these kits by shopping over at beadaholique.com choose your favorite color and get started with your circular brick stitch if you're new to our youtube channel here be sure to hit that subscribe button below to get all the latest from beadaholique.com you

Customer Reviews

Based on 1 review Write a review

You recently viewed

Clear recently viewed