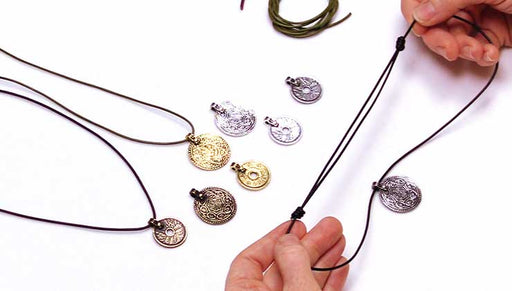
How to Make a Strung Cord Bracelet with a Sliding Square Knot Clasp

SKU VID-1694
Designer: Kat Silvia
This technique, showcased in the Mazatlan Bracelet, can be used with many different materials including cotton cord, paracord, leather, s-lon and more. Depending on the material of your choice we recommend a thread zap or other heat source to secure the ends. You can also use a glue if you prefer like GS Hypo Cement or E6000. Note for larger cords you will use larger beads.
FEATURED IN THIS VIDEO
Audio Transcript
Note: This audio transcript is auto-generated and may not be completely accurate.
hi this is kat with beadaholique.com i and i chose a really fun color palette and i'm gonna show you how to finish off the closure and how to add some little embellishments there to the end but these are really great they're kind of friendship like bracelets and you can just stack them up and go even more with more than seven if you want so these are really really fun so i'm going to show you how to do this in the video here so like I said I've chosen a beautiful color palette so let me draw your eye down here I have four colors that I just sort of put together very summery colors I have this beautiful turquoise this lovely sort of grapefruit peachy color I have a nice little grey because I wanted to just add in a little matte color and then I have this lovely sort of gunmetal it's almost a little bit purple so I thought that was really really pretty so these are Touhou 11 OC beads as you can see here so I have my four colors here but I did bring out some other colors because I wanted to show you just how bright and colourful and juicy you can make these bracelets and really make them your own and I am using white cord today but I did bring out a few of our other colors of the S lon now this is s LAN size 18 so this comes on a spool and you can actually see this is more of a full spool we've definitely used some here but you can make a lot of bracelets from just one color spool but don't be afraid to mix and match alright so when you have your Toho eleven OC beads and your s lon the other tools that you're going to need is I'm going to be using a third hand device and this is really just gonna help my demonstration in the video here so you can see very clearly what's going on with my little closure and my sliding knot and then I have a thread zap I also I'm going to be using a lighter I'll show you how to use both of those I have a pair of tweezers here I have a pair of cutters and the last thing that you'll need is a ruler so if you have all of your items ready let's go ahead and get started making these beautiful delicate bracelets okay so now that I have them off of my wrist I want to show you one now this is really simple we take some of that s line and we tie a little knot string on our beads but I want to show you what's happening in the clasp there cuz that's the most difficult part of these but it's actually still very simple so this is a sliding knot clasp you've probably also seen it with maybe a Shambhala bracelet or a macrame bracelet so I know it's difficult to see with those little white cords so I'm going to do it in a different color here but I just want to show you that this is adjustable and you can just kind of move this around on those cords but it's gonna stay nice and secure for you and I added the little embellishment there on the back with a couple extra seed beads but you don't have to you can finish that off with just a very little simple knot but since you have plenty of seed beads to play with feel free to just add whatever you want you can see that I've done a couple of different varieties here I've done some full beads and then I have some up here where it's just halfway done or you know I chose a little pattern there just to kind of break it up so you can have a lot of fun creating some really cool patterns alright so what I'm going to do here is I'm actually gonna use this red cord here so you can see it nice and easily so the first thing that we're gonna do is I'm gonna bring in my ruler and I'm gonna eyeball and cut off about sixteen inches now these will make you about seven inch bracelets but I'll show you how to kind of size this so what I'm gonna do first is I'm going to take those two ends together and I'm gonna come down here to the center now this is where I want my focal to be so for this one I'm just gonna do a short little focal so I'm gonna come down here and give myself maybe an inch on either side so once I found that little place I'm gonna come in and I'm gonna tie a little knot just a little simple overhand knot creating a little loop and again just kind of eyeballing that to where I want it to be so and you can double check that by bringing those ends together once more there we go and now you can see that I'll end up with my knot on the other side all right so with the s lon I'm gonna come in and this is fairly easy to string on with the eleven o beads so I'm just going to string on just a bunch of these blue ones if you are having trouble stringing them on you can do something you add a little bit of glue to the tip and that can sometimes help form a little needle and to do that we recommend the super new glue I do have a video showing you exactly how to do that so if you do end up making a lot of these bracelets it's a nice easy little trick alright so I'm just gonna string on some of these beads and the tell how 11 OHS works so great for this we have so many colors at beadaholique.com for you to choose from so you can create your own fun palettes and mixes it was just really really fun when you get a chance to see all those beautiful colors together and as you can see these ones here have a little you can they create a little core on them with that red cord I'm going through because they're so transparent so they give just a little hint of blue so that's really really fun to play with alright so I think that's good for my demonstration here so I'm just gonna do just a very tiny bit there alright so now what I'm gonna do is I'm gonna come to that end of the cord and I'm gonna create another overhand loop and bring my cord through there and here's a little trick in order to get that knot right up close what I'm gonna do is I'm gonna come in with my tweezers and kind of put it through the loop there and this is very similar to like a pearl knotting so I'm just gonna pinch the cord and I'm gonna bring that knot down and it's gonna fall right where I need it to and then I can just push it down just with my little tweezers there and I have my little nut where I want it to go alright so now I have that done so let's bring in our third hand now this is kind of a cool little tool and if you do end up making a lot of these it actually ends up being really nice to work with so we're going to take our strand and what I'm going to do is I'm gonna cross over my two cords just like that so now I'm gonna come in and I'm gonna pinch it on one side and pinch it on the other so you can see that I have my bracelet here it's criss crossed and don't worry about it being too centered because we have plenty of cord this is why you want to always cut a little extra cord if you can so now I have my two cords situated and I just want to kind of separate these so you can see a little bit easier okay so I have my two cords just like so alright so now for my demonstration I'm come in and let's see I'm gonna use I'm gonna use the blue cord so you can see this and you can absolutely use a different color cord to do this next step if you like all right and I'm gonna eyeball about eight to ten inches or so you don't really even need that much but just err on the side of safety okay so here's what we're gonna do we're gonna bring this cord around to the bottom and I'm gonna kind of Center it on that red cord there so here's what we're gonna do we're gonna do a macrame square knot which means I'm taking one side over I'm going behind and I'm going up and through to the other side and now I'm just gonna pull that tight but not too tight so a nice gentle tug and that's one so now we're gonna go the opposite direction so I'm putting this one over and I'm taking the left-hand cord down and around and I'm pinching it and pulling it up through that loop and across and just pulling that together so that's considered to be one square knot so we're gonna repeat that and again I'm gonna go back the other way so I'm bringing that cord up and over the top bringing the right hand cord down and through that loop and bringing it across and then tying our little square knot and then we're gonna finish the square knot by going over with the right hand one taking our left hand one down and behind and bringing it up and over and through and we're gonna tie that there so here's a great example of the sliding knot and you can see that it actually just moves along those two cords there so this is an example of two square knots now if you wanted a longer version I do have an example here where we've done a longer set so you can actually see that square knot develop you can absolutely do a longer set if you like or you can I wouldn't recommend doing a smaller set you can always add one or two more for safety alright so now here's where it gets a little bit tricky so we have a couple of options here what we're gonna do on this side is I'm gonna come in and I'm gonna clip the cord fairly close to the knot you see I have just a little bit happening on the outside there now please exercise caution and be very careful when working with a lighter but what we're gonna do is we're just gonna burn that end but this is a great another opportunity to really showcase the third hand because you don't have to get your hands nice and close to that so watch what I'm gonna do I'm gonna burn it and then I'm gonna use the bottom tip of my lighter just sort of smooth it down over the cord there all right here we go all right so you can kind of see on the end there it has a little burn and then it's nice and secure though so it sort of melts in on itself all right so what I'm gonna do is I'm gonna do that on the other side as well just come in with my little snips don't snip too close and what I'm gonna do here is I'm just gonna rotate this so that I don't have to get that lighter in on the inside we can keep it right on the outside there all right there we go just kind of rotated that so you see we have our little little nodule there so we're just going to come in and burn that and then just kind of smooth it out there all right now here's the test let that cool for just a couple of seconds but make sure that you're sliding that still works and it works perfect all right so now we can release it from our third hand here and set that aside and here's the last step the sizing so once you've gotten it to this point you see that we have plenty of cord on both sides so what I'm going to do is I'm going to open up that nice and wide and I'm going to try to slip it over my hand now the widest part of your hand is usually the fat of the thumb here and across the knuckles so what you can do now is you can kind of take these and just sort of push it together just a little bit and see how far you can get it and still get it on so I'm just kind of adjusting and slipping it on and that'll go on my wrist just like that all right now I got to take it off gently and go ahead and Center your your square knot there so I need you to Center mine and pull this side a little bit and just adjusting yeah here we go all right perfect okay so that's gonna fit on my wrist so now what we want to do is we want to come in and I want to make little knots here as close as I can to that square knot so this is one of my cords here so I'm just gonna come in and creating that loop one more time just a very simple overhand knot and again this is where those little bent nose tweezers come into play because we can come in and sneak in and grab where we want that knot to land and it's gonna land right there for us so that is our first little knot there and now on the other side we're just gonna repeat that same thing making that nice little overhand loop bringing that end through coming in with our tweezers going through the loop sneaking down to grab where we want that little knot to land and bringing that down together all right lovely so now let's say we just want to leave little nuts there you can add on a bead here I'll do it to one of them here let's say we want to add on a little bead and bring that down and just repeat that process there of doing that little loop bring it through coming in with our tweezers to pinch right there and then pulling that knot down and just remove your tweezers and what I like to do is kind of pinch over and just sort of squish that down just a little bit all right so that's how the side looks with a little bead on it it's very simple you can add three or four beads if you like so now I'm just pulling it away so it looks a little bit more like the other ones that I have here so here's another tip we can take this and we can snip it off I like to leave just a little bit on the end and then come in again trying to keep your fingers out of the way please come in with your lighter and just burn that little tip and there we go or what you can do is you can come on this side here and we can use our thread zaps now this has a little protector so you just remove that and what happens is you just push this up and that tip is going to light up get very hot so just go ahead in and this is going to zap off that thread just like so and because it does get warm it does have that nice little burned edge as well which is going to help it secure through that knot so that's how easy it is guys to make these little bracelets you can have so much fun choosing all of your favorite colors and it's very simple tools I just used a couple of extra things I'm using snips but you can also use scissors and you can use a household lighter but again please exercise caution when working with that and working with the thread zap as well so I hope you enjoyed this video you can get all of these supplies and choose even more wonderful colors by heading over to beadaholique.com

You recently viewed

Clear recently viewed