How to Bead Weave a Starburst Component with 2-Hole GemDuos and SuperDuo Duets

SKU VID-1365
Designer: Leslie Rogalski
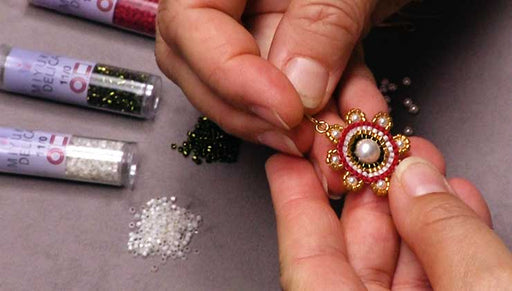
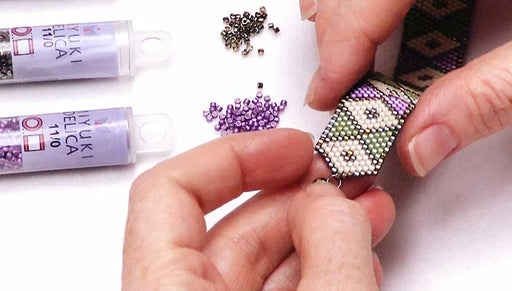
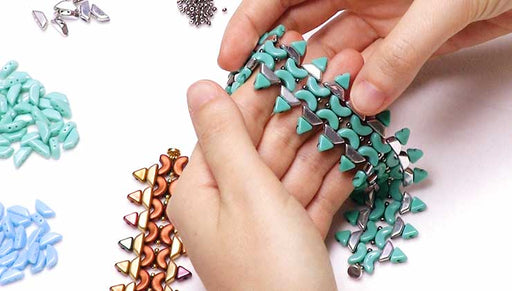
Leslie Rogalski, creative director of the Beadsmith, shows in this video how to bead weave a starburst focal using 2-Hole GemDuo beads and two-tone SuperDuo Duets. You'll also learn how to connect two of these components to make a bracelet, and hear Leslie's personal bead weaving tips gleaned during her beading career.
Audio Transcript
Note: This audio transcript is auto-generated and may not be completely accurate.
hi i'm leslie Rogowski creative director for the beadsmith and i am delighted to be here for beadaholique to talk to you about the gem duo's and show you how to make a component so you can make a pendant earrings or a bracelet now gem duo's are to hold beads and work like other to hold beads these fit together really nicely and they work in a lot of different techniques you can see peyote stitch here I've done a circular motif and made them dimensional they come in all different colors and finishes as you can see including the spectacular back lifts which are these luminescent colors that really go well with the solid colors whether you're talking about travertine finishes or metallic finishes or matte opaque finishes now I chose for the motif in this bracelet uses super duo duets which are two-tone and they really add this nice detail today I'm going to show you how to make a motif that you can add to connect it to another motif so I'm using red metallic gem duos solid black opaque super duos black and white duets and little sized 15-round Japanese seed beads because they fill in the gaps wherever there's a little bit of thread showing as you bring these other beads in I call them bridge beads so it works really well let's get started oh and we use a size twelve beading needle for these to make sure they fit through the fifteens and we're gonna use six pound black fireline you can use a thread snip or a thread zapper so I have my needle here and I have about thirty inches of thread and I'm gonna pick up a black super duo and a gem duo through what I'm gonna call the bottom hole so the points pointing away from you that would be the top hole the bottom Hall now one point about any to hold beads is you want to remember to check to make sure that both the holes are open before they're used because otherwise you could get halfway through your piece and you're gonna get stuck and have to undo it these have a hand process involved in making these glass beads and sometimes the coatings just clog the little holes not a lot but you do want to check so here I'm going to string a solid super duo and a gem duo four times all together and I'm going to tie it in a ring so I'm gonna do that right now one two and what I'm doing is as I'm picking it up I'm seeing if I can see through the little holes to make sure that they're all clear so I have three one more makes four and then I'm going to tie it in a ring make sure you're picking it through the bottom and I'm gonna pull it down leave me just enough of a tail to thread onto a needle and weave in and I'm gonna tie a nice square knot snug enough so you have a nice ring without a lot of thread showing but you want to make sure the beads stay flat so I'm gonna finish my square knot pull that nice and snug and I know it's a little wiggly on camera but there you go so there's your little ring now I found it easier to weave the tail thread in now before I do anything else so I'm gonna take a minute and do that and while I'm doing that I'm gonna show you the niftiest needle threading tip that anybody ever told me you're gonna flatten the end of your thread out you can use a little needle nose pliers if you want or you between your thumb and forefinger and you're flattening out to be flat because the eye of a needle is not round it's flat then you're gonna bring the thread down until you can barely see it like a poppy seed and you're gonna bring the eye of the needle down right down to the thread and it goes right in tada okay there's my tip for the day one of them now I'm gonna take my tail and I'm just gonna go through the ring through this the holes that I already stitched just to weave that out of the way cuz you don't need that thread anymore and I'm gonna pull it through them like two or three of the beads you don't even have to go all the way around the circle there you go you can see I'm going through the same holes that I just stitched the ring that would be round one right and then carefully you're gonna take your zap or your snips and you're just gonna snip your thread in where it won't be closed alrighty so here's where we are we have our little ring we have our other thread the working thread you don't ever want to start sewing from the knot you want to sew through a couple beads so that it doesn't make doesn't pull tension on the knot and I'm gonna sew around that same ring again but I want to come out a super duo for this design so again the same hole that's been stitched so far don't catch any other beads now I'm gonna step up and sew in Reverse through the open hole of the superdude oh I just came out of and you can see that right there alright now I'm ready for the second round now here's the deal with this project on either side of the super duo are going to go the 15s so I'm gonna pick up a 15 because I'm coming out the side of the super duo now it's time for the duets in this design the white sides face together so I'm gonna pick up my first duo from through the black side and here with the duets you really want to check to make sure that the colors are straight on either side to see how I'm rolling my bead back and forth and checking to make sure the hole is open then I'm gonna pick up one through the white side so do you see how the whites are facing together so I have my 15 and my two duets and I'm gonna go through the open hole there we go working around the circle in either direction it doesn't matter and you're gonna pull that snug so you have a 15 and the whets now you're gonna do this you're gonna pick up the duets facing the same way and a 15-2 sit next to the super duo so I'm gonna go pick up the black one check my line check my hall so through the white side check my line check the hall and pick up a 15 go through the super door all right I'm gonna put that down so you can see how that works so you can see that the whites are facing each other and there's a 15 on either side of the Superdome now I'm going to continue around and just repeat this picking up a 15 a pair of duets and going through the next gem duo so I'll do that quickly again checking checking my holes there you go and you want to pull this snug here's another tip when you sew with beads you always want to pull your thread perpendicular straight out of the hole you never want to do this or this cuz not only will it pull the beads out of alignment but it also kind of braids the thread against the holes of the beads so here notice that I've picked up my 15 last cuz it's it's against a super duo just like that we're gonna now pick up the 15 first so it's it's against the superdude I'll go for my next pair of duets go through the gem duo around and around I love the graphic nests of the duets oh now see I didn't pick up my 15 first better do that let's see there we go we want the 15s to sit against the super duos so that's usually my my goof spot on this project there pick it up 15 sits against the super duo now I pick up the 15 again and another pair of super duos through the black sides check my holes check the line so it's kind of that measure twice cut once thing isn't it you just want to make sure that you're not setting yourself up all right now I've come around the circle I want to go finish my round I'm not ready to step up yet I want to go through the first super duo that I exited in this round to finish my round and I'll put that down again so you can see so this is what it looks like so far now we're gonna have to continue through the beads and reverse through the dark side of a super duo in order to continue so I'm going to so continue sewing through this existing thread path just through that 15 and the super duo's said I can come out in position to continue the way this design is and the way I've worked this is I've reversed through that super duo because the thread is going to be on the outside of the super duo and by coming out of the dark side of the super duo duet you won't see it alright now we're ready to come back and reverse direction I've been working like this now we're going to reverse direction and I'm gonna just come through the open side in the middle of a pair of duets I'm gonna add another pair of duets between each pair of duets and I want to make sure that I do the same thing that I pick it up with the white sides facing together and check to make sure the lines are really nice and crisp and I can see through the holes I'm going to go through the super duos can you see how I have that set up right there like that now I'm just gonna show through the next super do a hole to come out in between the next pair and those two super duos where the thread is they're gonna pull together so you won't see the thread so here's what I do and you can do this in one move I break it down so you could see the different steps don't get caught there you go see how those two super do is sit together and now I'm gonna pick up another pair dark side light side check to make sure that the lines are clean and you're gonna add that second pair in between the next pair of super dos cool right okay now we're at a gem duo we're going to pick up another gem duo so if you see in the finish one then gem duo's in this round are gonna sit above the ones from the previous round and you want to come in through the bottom hole again you want to make sure that the points are pointing away so I have my super duo I mean my gem duo and I'm gonna go through the next duet super duo and it's gonna sit like that now I'm ready to add my pairs two pairs of the super duo duets and I'm gonna work all the way around adding this bring my other gem duo down okay white sides together nice and clean adding it you can do this in one motion now so through the next do it to add the pair and pull them together you can do that again one two nice and clean open holes now you're above a gem duo so you don't want to go so through the next pair yet you want to add another gem duo picking it up through that bottom hole and now you're gonna sew through the open hole see how that's being formed look we're almost done holy cow clean mine through and through another I think that's a solid color I don't need that okay white sides together clean lines check to see that the holes are open put your other pair in place in the next pair of super duets you're getting ready to pick up a gym duo again bottom hole through the next duet excellent so we're working our way around the circle and you want to make sure always that you have nice clean lines to put your debts in facing the same way but think about it though these I have designed this so the colors sit a certain way here you're gonna go through again and we're gonna add our last gem duo around this round the colors are sitting a certain way to give this graphic impact but think about if you have them all facing one direction or in the other it's that what if factor that makes it so fun to do and you can play with the super duo duets to get different light and dark colors and matching colors together now I'm gonna show you a little later maybe in another Facebook live or something show you some eye candy okay now we're gonna add the last gem duo and you're gonna go through you can go through both of these super duo duets and pull that in there nice and tight tada there you go that's all there is to it now you're gonna weave the thread in and all you're gonna do is weave through existing thread paths making a half hitch in an inconspicuous spot or two and I'll show you how I do that by bringing my thread out to where it's against the dark side of the duet I'm gonna pull my thread and then I'm gonna loop around the existing thread that's here and I'm gonna make a little half hitch so this is hooked in here and by going through the thread again just like you would not your shoelace it secures that thread and then I'm gonna weave through a couple more beads and I'm gonna be finished with this motif do it again do it again this is just when they say weave into secure that's what this means right and that that's there to stay now I want this to be trimmed nice and close I'm gonna use my thread zapper and I'm gonna hold my piece up so I can really see and it's nice I'm working on a nice light beat mat I'm gonna bring my threads up or down boom done alrighty cool right so you know if you wanted to you could just attach a little ring of beads here and add an ear wire or you could attach a longer ring of beads here and string it on a chain and have a pendant but I'm gonna show you how I attached it this way so I'm gonna turn my components like this and you can see that I'm using a new piece of thread to do this and my advice is when you join components always use a new piece of thread because that way if heaven forbid something happens to the join it's not gonna ruin the integrity of your whole piece so you'll always be able to fix it up pretty fast okay here's what I decided I was gonna do to join these I was gonna take a single solid color super duo and I'm gonna stitch it in between the duets you can see here how that's gonna work and in order to hide my thread as I come around and through I'm going to pick up this 15s and space them in between to bridge the beads so that you don't see any thread when I attach it and here's how I do it I start from the inside against the dark side and I'm just gonna pull that up and hold the tail with my fingers and you can see I only have a piece of thread that's maybe 12 or 15 inches now I'm going to pick up for size 15 one two three four and I'm going to sew in the white side of that middle superdude oh that's going to be used for the attachment and this way you don't see the thread you're gonna see the beads now the super duo gets picked up but first I'm gonna pick up a little 15 and the super duo and a little 15 I'm doing this so that those beads are gonna sit nice and straight in the join and then I'm gonna sew through that next super duo I'm trying to hold this it's a little awkward for me to sew it this way but I want you guys to see alright don't pull your tail out now I'm going to pick up four more 15 and come in on the opposite component and pull that together so you can see the little bridges formed now I'm gonna pick up a 15 so through the other hole of that super duo at a solid color one that I just put in the middle whoops so you're gonna sew through that hole and then you're gonna pick up another 15 here wait till I pull it straight and you'll see now you're gonna pick up a 15 and you're going to knot it to the tail thread and then knot is going to be hitting because it's against the dark side inside in a discreet inconspicuous place so I'm gonna not that let's see if I can leave it on the table so you can see all right there you go now I'm not gonna take time to weave the thread in here you would finish your square and on it I can do that and if you don't know how to make a square knot learn because it's really handy there you go now you can see how those components are hooked together and all you have to do now is make as many as you need to make a bracelet if you want you can use a similar technique to add your clasp it depends on what the clasp is you can see I've just used 15 and I like to start with a closed jump ring on the end because then there's no chance that the thread is going to come through and you put a closed jump ring on each end then you can use an open jump ring to attach what other clasp you want and remember to keep that in consideration when you decide how long this is going to be so I have no name for this except I call it a gem duo of a bracelet which I think I might stick with and how fun was that I hope that you were able to understand how this goes together and if you have that my job here is done I am Leslie Rogowski creative director for the bead Smith presenting here at beadaholique I love beads you

You recently viewed

Clear recently viewed