How to Add Rows of Beads to a Centerline Pendant

SKU VID-1659
Designer: Kat Silvia
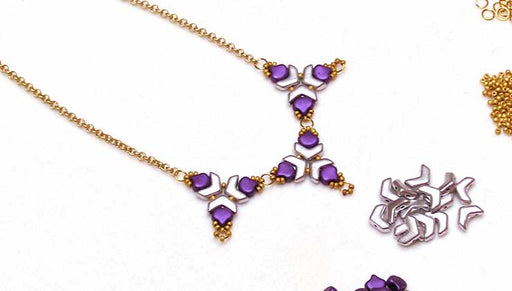
In this video you will learn how to use Nymo thread to add rows of 11/0 Miyuki Delica seed beads to a Centerline pendant. Miyuki Delicas fit perfectly into the channels and by using a Color Mix you can create a graduated pattern, as seen in our earring design.
Audio Transcript
Note: This audio transcript is auto-generated and may not be completely accurate.
Hi, this is Kat with beadaholique.com and my example we're gonna be adding four rows of those seed beads now I've done a nice graduated pattern here by using a really great Miyuki mix and if you don't have a mix you can just do one solid color you can create patterns in here I'm gonna show you exactly how many beads fit in each row but one of the cool things is is that this is a great project if you just have a few seed beads lying around or you want to create your own funky mix go for it because this uses so few beads that it's great to use up some extra seed beads that you might have from a different leftover project alright so I'm gonna be adding this bright green to this gold here because I want you to be able to see it but what I want to point out too is that you can barely see the threads here because I've used a nice silver thread and if you wanted to we do have a nice gold thread to go with the gold if you wanted to have that thread disappear another option for you is you can use a color that complements your seed beads or you can use a completely contrasting color and just make it part of the design element as well so I'm actually going to be using this purple here on that gold because I want you guys to be able to see what's happening so this is size D of our Nimmo thread so this is just a few selection of the colors that we have here so go ahead and shop beadaholique.com you can see all the colors and we're gonna be using a little GS hypo cement and I just have some snips or scissors here and then we're gonna be using a big eye needle this is really nice because it's nice and flexible and it's easy to string on your thread cuz it's got that nice big eye so I actually already have some of that purple thread onto my needle because I want to go ahead and dive right in alright so I have about three or four feet I think that's overkill I think you need about maybe three feet at most to do this because we don't have that much going on here alright so let me show you guys here on our Pease we have four holes on either side and four channels so what we're gonna do first is you are gonna have a front and back because we're gonna have to make little thread bridges so you're gonna see that so go ahead and start down here at the bottom and we're gonna bring our needle up through this side here and we're gonna leave a tail of about eight inches or so we're just gonna tie that off at the end so we'll just kind of let that hang out there alright so this first row at the bottom is going to be nine beads so one two three four five six seven eight and nine so now I'm gonna take my needle and I'm gonna go through that Center and bring it all the way to the back there and now I'm gonna come up through this first hole on the opposite side go ahead and pull that all the way through there we go and you see that nine beads sits in there so now I'm gonna take my needle and I'm gonna go back through all of those beads and I'm coming out on top there but what I really need to do is I need to be going to the back so I'm just gonna sneak my needle through the big center there and go through the back bringing my thread to the back of the piece now this is the front so I'm just gonna flip it over so you can see that I have my two little tails here now we're just gonna take this and I'm just gonna make a nice little overhand knot with my little tail here this is a nice easy way to tie this off there we go and I'm just going to repeat that making a second little knot alright there we go alright so now I'm going to come up through and I'm going to go through one more time all the way across alright so now I'm on top there so what I'm gonna do is I'm gonna go down through that hole there you go and now on the back I'm gonna go up to that second hole there and bring my thread through so I'm ready to start that next one so we do have on the back we do have that little tiny thread bridge right there alright so now for the next row we're going to add 12 beads so 1/7 8 9 10 11 and 12 alright so now we're gonna do the same thing so we're just gonna go down through the center so I want to come out the other side there and I'm just checking that my bead numbers are correct there we go and then we come up through that hole and you guessed it we're going back through so you're kind of doing like a little figure 8 thing here and just keep track of the top and the bottom so this is on top so we got to go through to the back and I'm going through that Center row there I'm not going through that end hole because now I can go up through that last hole there alright now obviously I don't need to tie a knot anymore so I'm just gonna go through back through once more coming out on top going down through the hole and now we're gonna make another thread bridge coming up so that we can start our third row here and our third row is going to be 14 beads so let's go ahead and do that this is the same same technique here 1 2 3 4 5 6 7 8 9 10 11 12 13 and 14 perfect alright so now we're going down through the center up through the hole across all the beads once more and again down through the center making sure to not catch any of those extra beads there there we go up through the hole and you guessed it we're going across once more up through the top there and down through that hole alright so this is going to be our last little thread bridge here we're gonna move up to that very last row and for this row it's only 15 I said 1 2 13 14 and 15 all right down through the center same as before through the hole and now we're working our way all the way across there down through the center through the whole and across once more alright so now we're finally getting our needle to the very back here I'm gonna show you what the back looks like so the front should have just all those threads just going evenly across and on the back we have three little thread bridges because we had to do those little step ups so I have one on this side and then two on this side but they're very slight and you can see that if you are using that gold thread it kind of blends right in so you don't really see it all that much alright so I have my thread coming out here so I am just going to take my needle and I'm gonna try to catch this little tiny thread bridge that's underneath here go through make a little loop yeah let's bring our needle back through there and we're just gonna tie it a nice neat little knot and then I'm just gonna take my thread I'm gonna go back through all those seed beads once more coming out the other side trying to stay on the back so I'm just kind of pushing my my beads up top there cuz all I want to do is I just want to kind of hide that thread in there just a little bit so let's see if I can get it there we go it's getting really thick in there with threads so you might just need to just kind of wiggle it wiggle it a little bit alright there we go I actually went through most of the beads so I'm happy with that I can clip off here and this will hide that thread really nicely so just getting my scissors nice and close and clipping off that thread alright now I'm just gonna take my needle and take it off of my extra thread you can see I have lots of extra thread there so when I said you only needed a you know a couple feet you're fine alright so now I'm just gonna slip this on to the beginning side and just do that same thing I'm just gonna try to run it through a few of these beads just to kind of tuck it in there there we go got it through most of them that'll work alright and just trim that off perfect alright so now I set that aside the last thing I suggest you do is just to take a little bit of Jesus hypo cement and this is really great because it's got a nice little pinpoint right so we're just gonna add a tiny little dab on that knot and a tiny little dab on that knot and that'll dry it nice and clear but that'll just secure those knots for you that way you don't have to worry about adding three or four knots to add bulk you will just have it be nice and clean so that is our little project there you just add rows of beads so again just to go over it one more time it is nine twelve fourteen and fifteen beads so if you're trying to think of making a cool little pattern or a zig zag in there you can absolutely do that but it's a great little project and you can see that we have the silver and the gold version so you can choose your thread choose your beads and just have a lot of fun you can turn this into a necklace or a pair of earrings like I've done here so lots of fun to be had with the center line pendants I hope you enjoyed this video you can shop all of these supplies and see even more videos by heading over to beadaholique.com

You recently viewed

Clear recently viewed