How to Make the Odessa Earrings featuring Cymbal Earring Posts for SuperDuo Beads

SKU VID-1817
Designer: Kat Silvia
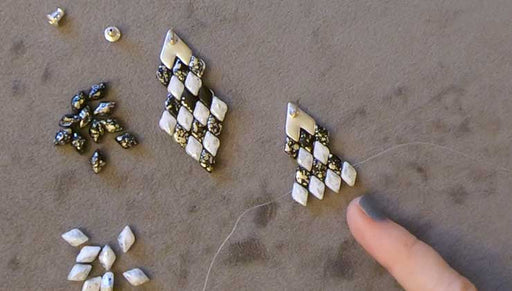
In this video you will learn how to create a bead woven SuperDuo earring using a method that allows for no thread bridges. This design comes together with the use of these golden Cymbal Earring Posts that coordinate perfectly with the SuperDuo Beads.
Audio Transcript
Note: This audio transcript is auto-generated and may not be completely accurate.
hi this is kat with beadaholique.com and in this video i'm going to show you how to make the odessa earrings featuring symbol earring posts for super duo beads so this is the finished piece here so you can see that i have my nice little superduos nestled right into that symbol earring finding and it's really nice they've coordinated them to work with specific beads so this is going to work with the little super duos all right so i have two colors here that i'm going to be working with i have this beautiful blue and this beautiful sort of raspberry red color i have two size 12 beading needles and onto these beading needles i have one strand of three feet of the smoke fireline in the four pound so we're going to be using a little double needle method for this one and then the only other tools that you're going to need is a pair of scissors or a thread zapper all right so if you have everything ready to go let's go ahead and get started okay so we're going to be using like i said that double needle method and to start i'm actually going to take this simple earring post and i'm going to flip it over i think it's just going to be a little bit easier to see so what we're going to do is we're going to take two of those little superduos and just sort of place them on their sides in those two little notches that are right in the center there and i know this seems a little silly but you'll see why in a second it's hard to get your needle all the way through there without sort of having to do multiple passes okay so now what we're going to do is we're going to pick up one of our little raspberry beads and go ahead and let that slide down and now take the needle in your right hand and sort of get it through those first little holes there and you can see i'm already knocking it out of place and go ahead and just sort of try to pick up that little bead this is really the hardest part i promise and grab that hole and come out the other side all right so you see that so it wasn't too bad all right and then i'm going to before i pull this all the way through string on one more of those raspberry beads and slide that down until it is about in the center of my fire line so just sort of adjust if you need to i know mine's mine's getting a little out of frame there hold on adjust if you need to but we just want to make sure that that's nice and centered for us all right there we go and now what we're going to do is we are going to turn around our thread now i'm right-handed so i always tend to work with with the right needle first but if you're left-handed and you want to do that please feel free okay so now what we're going to do turn around your thread and go through that first raspberry bead there and we're going to pull that through there we go actually fix that there we go all right now don't worry too much about your tension just yet it'll start to kind of come together and you'll see so don't worry if you have some some slack beads there all right so now pick up one of the blue beads go through a blue bead pick up one raspberry bead go through the blue bead and i'm trying to keep this on my table so you can sort of see it develop as as i work if it helps you you can absolutely pick it up with your hands all right now this last blue bead i'm just going to let hang there so i'm not going to go through that last raspberry bead so now the needle that's in my left hand i'm going to turn that around and go right through that same thread pass so this is that little criss-cross method and you want to make sure that you're picking up all the beads now you might be able to do this in one in one fell swoop you can see i'm sort of taking my needle and kind of going back and forth just making sure i pick up all those beads and i'm going to come out that last blue bead without picking up that last raspberry bead okay let me get my hand out of the way so you can see what's happening there all right so there we go so we've criss-crossed through so i'm coming out the top hole of these two little blue beads right here okay so we didn't go all the way through to the outside now what i'm trying to avoid here is creating those thread bridges on the outside of the design so that's why we're doing it this way okay now the needle that's in my right hand i'm going to turn it around and i'm going to go through that little blue bead pull that all the way through i'm now going to pick up a raspberry bead go through the raspberry i call them raspberry they could they could be pink magenta whatever whatever you're feeling all right there we go pick up another one another pink and go through that blue bead on the outside and now what we're going to do is we are going to pick up look at that we're going to pick up one of those blue beads and we're just going to kind of let him hang out to the side there okay now so you don't get confused i'm gonna just kind of kick him out to the side so what we're gonna do now is i'm gonna go back through that whole little thread pass and i'm trying to do this with my hands out of the way so you all can see and go through and i can only get through one on that one that's okay that's what i mean like if you need to turn it around or sort of adjust it and let me just sort of pick it up so you can see but we're just gonna crisscross back through and i'm creating a little design in mind if you want you can do this you know sort of without that there's no nothing saying you can't alright so now i'm coming out that blue bead to the side and i'm going to add on one more blue bead just like so okay so now i have my two little sort of hanging blue beads so now take your right needle and go through that blue bead there we go and i'm going to add on another blue bead go through my raspberry pick up another raspberry go through and pick up one more blue and i'm just going to let him kind of hang out there okay so now what we're going to do is take the needle in the left hand turn that first one around and go through that superduo there and try to go all the way through if we can but we are only going to go through that first little blue bead there so it's the same method where you sort of don't go through that last bead okay so and both of these again we are coming out the top hole of these two little blue beads here let's see if i can get that more there you go these two little blue beads here okay so this is sort of that little method and then as we continue this is what i mean where you can if you want you can lengthen it you can make this a much longer piece but if what we're going to start to do now here in a second is we're going to do one more row of that and then we're going to taper it down so go ahead and turn your thread around on the right needle and we're going to go ahead and pick up a blue superduo go through that raspberry there pick up another blue superduo go through that res or go through the blue and now we're gonna pick up one of those raspberries and let that fall to the side so you can see this is the same the same kind of method here that we're doing because we don't want to create any of those extra thread bridges if we don't have to go back through and sorry and make sure i turn this around correctly go all the way back through out the side there we go sorry for the little little turn around there and pick up come on pick up one more of those raspberry beads and slide that down okay all right so now we can go back through and now here's where we start the taper so we're gonna go back through that raspberry bead on the outside pick up one raspberry bead go through sorry let me make sure it's in camera sorry sorry sorry and then one of the blue beads and then one raspberry bead and let that just kind of sit there and then on the left hand needle we're going to turn that around and we're going to go all the way back through all of those little beads there and we're going to come out we don't want to go through that final raspberry bead don't want to go through that there we go i feel like this might look a more a little bit more complicated because i'm trying to pick it up and put it down so you can see but once you sort of get this going it's a little a little easier to to work with to finagle all right now i'm just kind of giving everything a little tug making sure everyone's nice and nice and tight in there okay so now usually we would add on that extra bead on the outside but now we are just going to taper it down so all i'm going to do is go through that raspberry bead there add on another add on one more come on slide down there we go all right and he's just going to hang out in there and then we're going to take our needle and go back through because we don't want to create that thread bridge on the outside and through that blue and we can go through that little pink bead there perfect all right now turn that around and for my little design here i'm finishing it off with one of the blue beads and i'm just sort of crisscrossing that through there we go and now i'm coming out the top of that pink bead there and i'm just going to criss cross that through so that you can see that this is where we're coming out here just to the sides of those purple beads so now all you need to do is loop it back through and tie off your threads so i'll show you that really quick so i'm just going to go back through this one purple bead or pink or raspberry whichever color you decide it is now because i've tightened it up i am having a little trouble kind of getting my needle through there so just be patient there we go all right so i'm going to pull nice and tight i'm going to go down and i'm going to catch that little thread bridge that's in between those beads create a little loop bring my needle through and pull pull pull tight now because this isn't a bracelet you don't need to do multiple knots if you don't like i think you know sort of one knot should we should really do it so i'm just going to do that and then remove that move to the other side let's tie off our other little thread here get that out of the way there we go and just the same thing so there is this sort of one bead on the bottom that you'll have that extra thread now if you are using lighter color beads i recommend you use the crystal fire line if you are using black beads or very dark beads we also do have the black satin fire line so you can use that as well if you need something that's a little bit darker if the smoke's a little light for you because it's kind of a gray all right and sneak through come on there we go now the reason i'm also doing this all in the back is that i can zap all my threads off on the back so the front is nice and clean so i just come in with my thread zapper let it heat up for just a second there and zap off one thread and all i'm doing is just touching it to the thread and it's sort of sealing it and zapping it off for me there we go okay so that is it i know it seemed a little a little crazy there but it's a really fun result and i love the way that these earrings can look together you can choose lots of different colors you can choose lots of different styles i like i said i did a little diamond style there you can absolutely do it longer lots of fun things to do and just go ahead and choose your favorite earring back to finish the look alright thank you so much for joining me i hope you enjoyed this video you can see more videos and even more full tutorials by heading over to beadaholique.com of course you can shop everything you've seen here at beadaholique.com as well and if you're new here to our youtube channel be sure to hit that subscribe button below to get all the latest from beadaholique.com you

Customer Reviews

Based on 1 review Write a review

You recently viewed

Clear recently viewed