Tips for Advanced Brick Stitch Patterns

SKU VID-1712
Designer: Kat Silvia
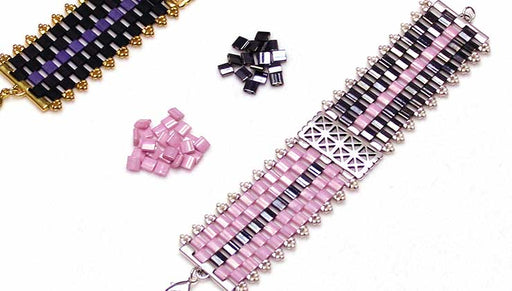
In this video you will learn some helpful tips when reading a brick stitch pattern to make large increases and decreases which will assist you when making various shapes. For Brick Stitch, we recommend using Miyuki Delica beads. They fit together nicely and make for sharp patterns.
Audio Transcript
Note: This audio transcript is auto-generated and may not be completely accurate.
hi this is kat with beadaholique.com and i at n shinto my little jack-o'-lantern here and now on the sky you'll notice the sort of center panel here before it starts doing all those decreases this is a very typical style of brick stitch where you having that little jog in and out of those beads right there and to show you that let me show you our little pattern here now this is a little tutorial this is a little PDF that you can download at beadaholique.com and it kind of walks you through the basic of a brick stitch so you're always going to start with that ladder stitch and then you'll notice you'll get that second row where you'll have that one B that sort of juts out to the side so down here you'll notice when you do that third row it's going to jet out to the other side so when you're looking at a full three rows of brick stitch this is what you have so if you're going to add an extra bead to the one side or to one side here that is called an increase and then if you want to taper it down that is a decrease so just show you a decrease a very simple one let me draw your attention to my little candy corn here so that ladder stitch row is all the way at the bottom and then instead of adding that extra bead to the side we've done our decreases now we do have a video showing you how to do increases and decreases so this is a really interesting way to sort of get that nice little triangle shape and then up at the top here let me pick this up because I know it's a white bead on my white mat there but up at the top you can see that I have my two little beads right there and then the bead at the top is actually on its side because that allows me to fit a four millimeter 22 gauge jump ring right through that little bead right there at the top so that's a nice little way to hang things so if you were going to do it to the side here you can also sneak a little jump ring in there as well so that is a really basic decrease now let's say you're going to do increases and decreases which is what's happening here with my little pumpkin so you'll notice that the first row is actually an increase and then that second row is a decrease and this might be easier for me to show you on the actual pattern so I have my pattern here so hopefully you can see this a little bit easier so what's happening here is this row is where I suggest you start now you can start either here or here but I wouldn't start down at the bottom so that's another thing to think about when you're doing your patterns is where are you gonna start now I always recommend starting at probably one of the more wide points so you can start right here in the middle or all of these four rows are going to be the same so you can start at one side and leave an extra long tail for you to go back and use that tail to work your way down and do those decreases and then if you want to work your way up you'll be able to go all the way up here okay now let's talk really quick about what happens when you get to a point like this where you have to then not only jump over one bead but you have to jump over two in order to add your next row so let's say you're coming out here what you're going to need to do is you wouldn't want to go out here with your thread because that'll create a little thread bridge so I recommend going down through this bead and you'll go through that bead create your thread bridge coming up here and then your coming out this bead so then you're ready to do your increase so it's as though this row no longer exists so that's how you do it so you come out this bead into this one in here in here and then you're turned around to come out this bead that is the easiest way to do that and then you pick up your two beads and you go under your thread bridge your second thread bridge there to jet those in so again you kind of just do the same thing and this is that little beat it up at the top so if you have those two bridge beads you'll be able to do that now let's talk for a little second about my ghost here now my top row here does not have an even number of beads so I can't go from one bead to the next in terms of adding that extra little bead at the top so what you're gonna see and let me kind of put that against my finger there instead of going through one bead and going down through another I've come up through the center bead added that bead at the top and gone right back down through that Center bead so that's another option as well so don't feel like you have to have an odd number at the top in order to get that little extra bead to hang something off of you can also sew in a closed jump ring do not sew in an open jump ring that's too much risk of it popping out so you can also sew in a closed jump ring if you did not want to add that extra bead let's say you wanted a thicker jump ring you can absolutely do that there as well okay now let's talk about something that's a little bit more unique and that is my little bad here so I have my little bat here and my little pattern now what I've done is all these little points here on the edge of my bat those are all those beads that are facing to the side because I wanted to make sure that I could get my jump ring through here and my jump ring through here but I also wanted these little points to make him a little a little scary I thought that would be kind of fun now when you're working with this type of a pattern what you're going to need to do is again I would start here at this row this is your longest row here so it's the little bottom of the fangs row so start here and then work your way up now this big panel in the center that's going to be the easiest and let's say you come to one side here here's what I would recommend you do I would work your way up and do your increase or excuse me do your decreases and finish this and then get your thread all the way back down here go through a couple beads and then come up here do the same here do your little decrease go all the way down do your little decrease come all the way down and so on and so forth and then again leave a tail and you'll do the same thing here so you'll add that big long row there and then once you get here you'll add your little row go back down and come over to the right beads do your couple decreases come back down and so on and so forth so that's how I would do something that's got all these little extra pieces when you're really looking at like that extra panel in the center and then the pieces that sort of surrounded so that's one way to sort of think about some of those patterns there now if you look closely and let me pull in my little pumpkin here you'll notice that I have the beads sitting going up and down so those are my threads there they're going up and down except for that bead at the top that is sitting excuse me that is sitting to the side there so you have an option you can do it that way or in my little kitty cat here you'll notice that the beads are facing this way so what you can do is you can actually flip your pattern there's no right or wrong way to do your pattern so then what you do is you're actually doing this as your first ladder stitch row and you're working your way up and you're just going to the to one side you have a smaller row in the middle and then you're turning it around and kind of working your way to the other side so it's sort of a matter of you know you're increasing up and over here and then you're sort of doing your decrease on that side there but it's the same number of beads so you have that option as well so here is one more example of that and I have my little my little figure here and now again you'll see that the beads are going you know your thread path is going to the side there so if you look this way where's the best place to start with something like this because you have his little arm and you have all these little feet and you have this little hump in the back I would recommend the best place to start being this last row of his belly there and that will get you a nice long ladder stitch row and then you can fill out this side and then fill out this side because that way you can end over here so that's just something to think about now these are all advanced patterns so if you are unfamiliar with brick stitch we do have several videos showing you how to do that we do the increases we do the decreases we also have several different patterns to kind of help walk you through some different shapes but if you do want to start creating your own shapes we do have a beautiful free download and this is a nice little grid I know it's a little faint here to see on camera but it nice little grid for you to start making you know any little patterns and you can sort of see the shapes that you can create here lots of nice sharp lines and the last thing I'll say about brick stitch is that today I've been using the miyuki delicas and these are the eleven O's and you can see how they just really fit together like cute little bricks and it makes it really really easy for this stitch you can of course use round seed beads as well there's no wrong seed bead to use with it but I just like the elegant way that these all fit together it gives me really nice sharp lines when I'm creating my brick stitch patterns if you have more questions be sure to leave them in the comments here below and thank you for watching and you can find all of these supplies and even more beading patterns over at beadaholique.com

You recently viewed

Clear recently viewed