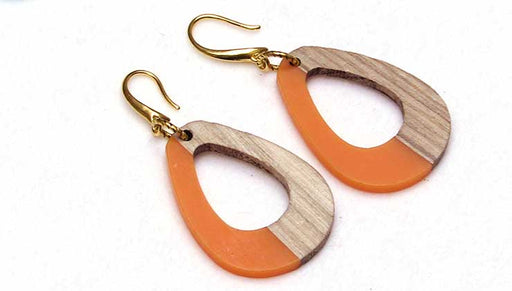
Quick & Easy DIY Jewelry: Sunflower Summer Earrings

SKU VID-1752
Designer: Kat Silvia
In this video you will learn how to make the Sunflower Summer Earrings from start to finish. Using an alternative simple wire loop technique you will be able to have your earring facing the right way and be able to accommodate the large wood and resin pendant focal from Zola Elements.
Audio Transcript
Note: This audio transcript is auto-generated and may not be completely accurate.
hi this is kat with beadaholique.com and resin vocals now you can see how beautiful and colorful they all are here on my table and I chose this beautiful sunflower marigold really rich yellow color so today I'm gonna be using this in my piece now what I love about this is they're really lightweight because you have that nice wood at the bottom and that colorful risen at the top and even though they're a little bit thick they're still very very lightweight so this is gonna be a lovely little wear so to bring out some of that beautiful color and I was inspired by the sunflower I'm gonna be using some black Swarovski pearls now these have a nice little pearlescent to them so I'm gonna be using these in my design and I've chosen to go with gold although I actually feel like this design could work really well in silver as well so before I get into my design I just want to talk to you about everything else that I have here on my table and I have a couple of different shapes so I wanted to show you that this will work with some of these other shapes so this is a really cool almost like a surfboard shape and I wanted to keep this one really nautical so instead of a sort of a ski pearl there excuse me I wanted to use that cultured sea glass round bead so I wanted to give that a nice little nautical feel with the white and the blue so you can see we have lots of different colors to choose from there and of course you have that yellow there at the top now we have some little smaller ones here and now these are little teardrops and I just love those they're so sweet again it'll be the same type of technique and then the larger teardrops that I'm going to be using here in my design so I just brought out some of those other colors so you could see some of the design opportunities alright so we're gonna need some really basic tools for today we're gonna need a pair of round nose pliers a pair of cutters and a couple pairs of chain nose pliers all right so let's go ahead and get started so very simply I'm gonna take my two inch eye pin now this is a 22 gauge and I'm just gonna slide on my pearl and let that drop all the way down to the bottom now because I was saying that these vocals are a little thick because if the resin that little loop isn't gonna fit through there you're not going to be able to get that through there so what we're gonna do is we're going to actually treat this as though when I flip it over like this the hook is going to attach to this top one here so what we're creating now is we're creating that bottom loop so what we want to do also is we want to sort of make sure that our loop is perpendicular to that one so we don't want it to be parallel we don't want our loop to go this way we need our loop to go around sort of sort of towards the back so I'm going to show you how to do that all right so we're gonna come in with our round nose pliers and just grip the very very base of our bead there right on top and I'll just go ahead and Bend that backwards and now move your pliers in so that they're almost to the edge there because what we want to do is we want to create a larger loop and because this is tapered we're gonna be able to create that larger loop back here further on the pliers so go ahead and grip that and then we're gonna bend it up and over our round nose pliers and just sort of rotate our pliers and bring that across to create a nice round loop there just like so all right we can remove our pliers you can see how big that loop is and how its facing the opposite direction there and we're just gonna come in with our flush cutters and cut that off all right we can set our little scrap aside and now we're just gonna take our chain nose pliers and we're just gonna open that up and now we can slide on our focal and now we're just going to give that a nice little closure just like so so you can see that we have that oriented the right way so now what I'm going to do is I'm going to and let me see I can probably do this without my other plier I'm just gonna gently open and twist that and then I'm going to slide on my earring hook and close that back up so you can see the reason why we had to do it that way is so that our hook is gonna face the correct way you don't want it facing to the side there so that's how easy it is so I'm going to do the other one real quick just to see so that excuse me just so that you can see the pair this is gonna be nice and easy and this is really fun I love how lightweight those Ola elements is and you can get all of these at beadaholique.com so we're gonna have all of those available to you yeah just trim that off and let's get that in this little twist to open and I like using the 22 gauge because it's so lightweight you don't need a heavier gauge you can use 21 if you like but I recommend the 22 I think it'll be just enough for you all right I'm just gonna twist that little top loop slip on my earring hook and close that back up and the Swarovski pearl is an 8 millimeter so just you can see the scale there so you can also do some great gemstones or drusy beads or something really really fun there up at the top alright so that is how quick and easy that was this is the sunflower summer earrings I hope you enjoyed this video you can get all of these supplies and see even more tutorials by heading over to beadaholique.com and if you're new to our youtube channel and be sure to hit that subscribe button below

You recently viewed

Clear recently viewed