Audio Transcript
Note: This audio transcript is auto-generated and may not be completely accurate.
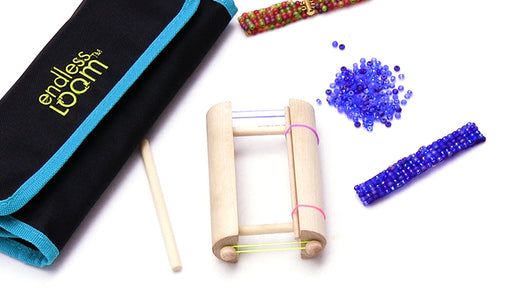
Hi, this is Julie Batali in this video I'm gonna teach you how to use the rapid loom so this is a pretty cool loom I really like it by rainbow loom and in this kit in this box you're going to get everything that you see here so you're going to get the Loom itself which I'm going to show you how to assemble in just a minute a little bead stand an assortment of beads some buttons some nylon cord some wrap line and two full instruction sheets and the instructions are really detailed and very nice so first off let me show you how to assemble it now if you wanted to follow the instructions you're going to have them which is really handy but I'm going to just show you how to do it right here so first off you get a little bead stand you're going to go like this prop it up and here and there's a little channel that your beads are going to go through and that's going to help you to string on your beads I'm going to set that aside because it's not really part of the loom is just a little accessory so you're going to get two feet and then you're going to get these two pieces right here and the feet have little rubber bands on them which actually prevent them from sliding around your work surface so you're just going to go ahead flip this upside down put one foot on one end and the other on the other end so there's your little stand now you'll notice you've got two sides one with this little kick-out piece right here and one that's flat on the side that has this notch you're going to take this piece right here and slide it over it so that's going to anchor it and I know this actually looks kind of different than what you might be used to for a loom it's going to make complete sense once you start doing and is really really easy to do this other piece you just are going to take these tabs and slide it over this edge right here just like that it slides back and forth and the tension of your cord is what's going to keep it in place so we have actually just assembled the rapid loom it was that easy like I said if you wanted to you could follow the instructions now on the back side this instruction our bracelet templates so if you look closely right here you'll see there's all different styles of bracelets that you can make so some with a couple beads like two beads wide single bead wide here you're getting this really interesting scalloped edge and what that's going to show you is how many beads are going to be needed and you've got those beads included and then how long your cord is going to be so here when they say cord they're referring to the nylon cord which is going to be the outer cord and then how much wrap line you're going to need so I'm just going to do a simple bracelet here I think I'll just do one that's a couple beads wide so this here is going to let me know I need 30 inches of cord and 36 inches of wrap line and Steven got a ruler right here for you so I'm going to pull up my ruler though so 30 inches of the outer cord now I'm going to be using the beads in the cord that come with the kit because you're going to be getting them too but you can definitely use your own beads and I'm going to show you something in just a minute here so there we cut that cord there we need 36 inches of this guy so 1530 and now we just need six more six okay so we can set aside our chords now like I said we're going to be using their beads and their supplies but I did do up another bracelet using this loom using some of the supplies I had here at beadaholique so I tear a cast button and I use some Toho beads and waxed cotton cord and some s long along the edge and I also discovered you guys use Griffin silk so this was just a finished example because I wanted you to be able to see the type of bracelet you're going to be making with this loom alright so let's go back to the supplies we have here so we're going to pick a button you're always going to start with a button so let's see maybe I'll do for the video because I want it to be easy for you to see maybe I'll do black and let's do juju juice I think black and pink is going to be easiest to see and I'm just going to go ahead and put it with a purple button because I'm not so concerned with the color of my design as showing you how to do the design so we've got that now if you take this other instruction manual you open it up you again see really detailed step-by-step instructions which I love and I followed these when I was learning how to do this I followed these exactly and it made perfect sense it was very easy to comprehend but since I have done this before I'm going to just go ahead and show you so you're going to take your button and you're going to take your cord so this is going to be your outer cord and you're going to go through the button and then you're going to go through the other buttonhole now what you want to do is you want to have it centered so you want your two ends to meet okay so there are my ends line up and now what we're going to do is we're going to secure this button in place by tying an overhand knot with both cords so if you didn't see what I just did I just took the cord I'm wrapping you're on my fingers and pushing both ends through so I'm holding everything together and then once I've got that knot I want to make sure that I slide it down as close to my button as possible and then pull it really nice and tight so now what we're going to do is we need to go ahead and make sure that this is the right length you can use a ruler let's say you want to make a bracelet that's six and a half inches okay so you could put it on here and you can measure six and a half inches you could also just wrap it around your wrist and allow a little bit of extra space as well so the key here is to make sure that these two lines are even so when I pull them there's no big gap and I have my six and a half inch mark and I'm going to hold it right there I'm going to tie another knot a little bit tricky because I am holding that mark in place where I want that not to sit down next to so go ahead and pull it and before I pull it really tight let me just make sure I'm still at about the six and a half and I am and then pull so there we go we've got one knot now we need a knot for the button to go through which will be your how you end up using this as a clasp so you want to leave about a half an inch between knots for this size button you'll course adjust your size accordingly depending on the size of your button but you're making a buttonhole basically okay so let's see before I pull that too tight just make sure that that's going to go through there okay and it is and I can pull this nice and tight we're going to do one more so it actually becomes an adjustable length bracelet and again about the same distance and pull nice and snug now we can go ahead and trim our ends and you want to leave about half an inch so we've created the foundation for our bracelet now we're going to go ahead and string this herb that's not actually been stringing it's just anchoring it to our loom so on this side here what you're going to do there's a little opening you're going to slip the button and through it so if you look up here you can see that it's really nice and secure right there now you're going to stretch this across let me see if there's a good angle for you here there's another little opening right here so you're going to go ahead put that through so that it stops with the knot and then if you look down here there is like a little notch which is going to go into these slots and you just pull it back until it's nice and tight and now you have a good surface to start doing your loom work so you're going to be doing wrappings here so I like to work with it facing me like this so the button up top the knots down at the bottom this nice and tight and what we're going to do here I'm going to spread out our view so there is a bead to stand and what you can do so like that with a few beads sheikha and what they end up doing is lining up for you on here so you have a nice hole which is easily accessible to put your cord through but I'm going to be using two colors here so I'm going to put some in here a little harder with two colors I'm also just going to put some down here I think I've done so much beading that I'm just used to my beads being on the table but you can do either one so now you're going to take your wrap line and you're going to start with it on top of your outer cord and you're going to slip one end under and over you're going to do the same thing on the other end as well so this is what it looks like and I want to show that one more time in case you missed it so you start with it on top pull these guys apart take one side you go around the outside under and then through so it comes out on your right you do the same thing here just go under and that's what you've got now you want to make sure that these are even so I'm just pulling them up to the top to make sure they're even and they are and then you scoot this guy all the way down so he's right up top there and then you're going to tie a simple overhand knot and just pull it down and scoot that way up to the top and now we are ready to begin so now we're just going to come through so that we're going around the outside under and through the middle and out just like that now we're going to pick up a bead I'm going to start with just one you don't need a needle this is actually a stiff enough line so you go ahead and string it on one side and then you crisscross through okay you pull both ends you're going to see he's going to sit right down here now I want to make this too wide so the next time I'm going to add two beads so again I'm going to go from the outside under through the middle and back out same thing with this side it's a little easier to see now that we have some separation for our outer cord now we're going to add two and I'm going to do a black one as well as a pink one okay so I've got that on one side and I'm going to go ahead and take my other cord go through the opposite direction crisscross in the middle take my two ends and pull and I'm going to create a checkerboard design here and you see how we're starting to get the rap along the outer edge so again every time you add beads and you pull them down the next step is always making it so that your cords your rap line are in the right position to add your next series of beads so I want to add a pink one and a black one and criss cross and pull you see that checkerboard starting to form and this is creating a nice wider gap here so these are all going to be uniform and you can make it as wide as you want so we could be adding three or four beads there's a lot of variation you can do with this so here we go our lines are ready again I'm just going to do a couple more and then I'll do it off-camera and show you how to end it but this is it this is all there is to it is really easy it's very fun you get a very nice professional result in a short amount of time and you can do a lot of different variations on this design here which is fun because you think of the whole catalog of beads out there you can do Toho's you can do Czech glass there's all different types of beads you can use on this loom and we're going to be creating other videos showing you different styles as well but I wanted to use the supplies that came with the loom because you're going to be getting them too and they're great to practice with although I have to say I didn't actually need much practice this really came together quickly it was very easy to understand so it was very fun okay so you see what's happening is we're just building our bracelet and do one more and then I'll finish it off camera I'll get all the way down to the end and then I'm going to show you how to end it so let's see I need a black and a pink there we go so keep on doing your beads until you get to the end which is where I'm going to be and then I'll show you how to finish this bracelet off I'm almost done and I started with 36 inches for my six and a half inch bracelet it's a little squeaky you do get plenty of this so I would actually recommend just cutting yourself a little bit of extra so you don't end up kind of getting low at the end all right that's what happens when you are beating I'm just going to let that be so I'm sure everyone has done that a million times over anyways I want to show you a little tip right here so we're seeing that we're down towards the end what's great is because you have multiple knots what you can do is you can slip your knot out and then go to the next knot pull your piece back a little bit so it's nice and tight again and now you can clearly see your end point so I can either do another set of two or I can just do one at this point I think I'll do another set of two so we're going to go under and under so now we need that black one and a pink one I don't know about other beaters out there but I am always finding beads in my cushions and in my carpet and everywhere else it seems completely unavoidable alright so there we go now I'm just going to do one more so it ends up tapered like how it was when we started again under under okay and one last bead got that crisscross there we go so now we just need to end it and it's really simple to do so you're going to take the right hand wrap cord and go under and go around again so you're going twice you're going to do the same thing with the left hand one pull it through and now we're just going to tie a knot we're going to make three knots and I actually like to do a double knot on that one okay and then we can just trim our ends we've got a nice little knot you keep it push it down in there if you wanted to so it's more on the back side but we just finished our bracelet let me show you how you take it off you just slip it off there we go and it's really nice and substantial so that there is our bracelet and you just go ahead and use little button closure right here that's how you're going to secure your bracelet that's your clasp it sits right in there you can see all the nice wrappings along the side and all of these beads are in place they're very secure and it has a nice body to it it actually has a nice stiffness to it although it's still quite flexible so that was just using the supplies that came with the rapid loom and I want to bring back the bracelet I did here using some Toho's and then I have another one in progress I want to show you real quick normally I would not take one off the loom in progress but I wanted to go ahead and shoot this video and I wasn't done with this one yet but I did discover I'm just gonna be able to easily slip it back onto my loom show you real quick again I'm using a Terra cast button let's slip this guy back on here and there's something I want to show you with this one and I'm going to be doing more videos with this loom but let me just show you something with this one that I did ok so now we're ready to go again with him and I've used Czech glass beads in the middle but I used Griffin silk and what's nice is Griffin silk comes with a needle already attached and for the other side I just used a twisted wire needle so a really thin needle on the other side so now I can easily pick up my beads so if you aren't going to be using a rapid cord like this or you want something that's maybe a little bit thinner or softer you can go ahead and use Griffin silk and you twisted wire needle or you can use s LAN and s LAN was stiff enough that I didn't need to use any type of needle either so again this is the rapid loom by rainbow loom it is a really fun fun tool and a lot of different types of projects you can create on it a lot of different beads that can be used and you can do different widths and you can also do like a scalloped design which I'll show you in another video so I hope you enjoyed this video you can find the rapid get at beadaholique you

Customer Reviews

Based on 1 review Write a review

You recently viewed

Clear recently viewed

Customer Reviews

Based on 1 review
100%
(1)
0%
(0)
0%
(0)
0%
(0)
0%
(0)
J
Jeannie
Easy peasy!

Thanks for a very nice, easy to understand video, Julie!

When using an overhand knot that needs to be tight, try using a surgeons's knot: left over right, and then again, left over right; this gives you two wraps on the bottom. Then finish with right over left and snug it down. Very secure!

Check here: https://wolfandiron.com/blogs/feedthewolf/how-to-tie-a-surgeon-s-knot
for visual.